Database Reference
In-Depth Information
The
SQL Editor
tabbed window
The
SQL Editor
menu and toolbar
The
Object Browser
The Cape Codd
database
The Cape Codd
database tables
The
Query
tabbed
window—enter your
SQL statement
The
Execute Current
SQL Statement in
Connected Server
button
The query results in
the results
tabbed window
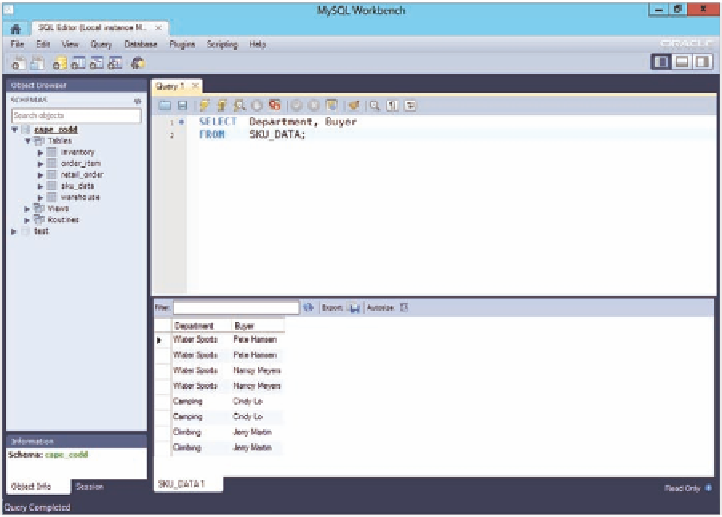
Figure 2-20
Running an SQL Query
in the MySQL Workbench
it on your computer. Read the appropriate sections of Chapter 10C about obtaining and
installing MySQL Community Server 5.6.
After you have MySQL 5.6 installed, you will need to read the introductory discussion
for MySQL 5.6 in Chapter 10C, starting on page 10C-1, and create the Cape Codd database.
MySQL scripts for creating and populating the Cape Codd database tables are available on our
Web site at
www.pearsonhighered.com/kroenke
.
MySQL 5.6 uses the MySQL Workbench as the GUI tool for managing the MySQL 5.6 DBMS
and the databases controlled by the DBMS. This tool must be installed separately from the MySQL
5.6 DBMS and this is discussed in Chapter 10C. SQL statements are created and run in the MySQL
Workbench, and Figure 2-20 shows the execution of SQL-Query-CH02-01 (note that the SQL com-
ment is
not
included in the SQL statement as run—also note that the SQL comment
could
have
been included in the SQL code if we had chosen to include it):
/* *** SQL-Query-CH02-01 *** */
SELECT
Department, Buyer
FROM
SKU_DATA;
Running an SQL Query in the MySQL Workbench
1.
To make the Cape Codd database the default schema (active database), right-click
the cape_codd schema (database) object to display the shortcut menu and then click
the
Set as Default Schema
command.
2.
In the Query 1 tabbed window in the SQL Editor tabbed window, type the SQL
SELECT command (
without
the SQL comment line shown above):
SELECT
Department, Buyer
FROM
SKU_DATA;
as shown in Figure 2-20.


Search WWH ::

Custom Search