Hardware Reference
In-Depth Information
InstallingtheOpticalDrive
The next step is to install the optical drive in one of the 5.25” external drive
bays at the top of the DF-85 case. Each of those is covered by a swinging door
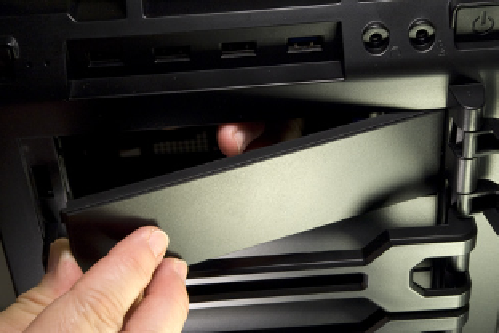
that looks like an open-end wrench. (We love it.) To begin, press in on the left
side of the top door to release the catch and then swing the door open, as
shown in Figure 5-59.
Working from inside the case, use your fingers or the end of a screwdriver to press
out on the plastic drive bay bezel until it snaps out, as shown in Figure 5-60.
Figure 5-59.
Press in on the left side to release the catch, and then
swing open the door covering the top 5.25” drive bay
Figure 5-60.
Snap out the plastic drive bezel
We intended to install our DVD writer in the top drive bay, but when we at-
tempted to slide the drive into the bay we found that it was obstructed by the
cables that feed the removable 2.5” drive bay on top of the case. Although we
could have crammed the drive into that top bay, we decided to leave that bay
unused and install our optical drive in the middle bay.
To remove the steel RF shielding plate from the middle drive bay, insert a
screwdriver and twist the plate back and forth, as shown in Figure 5-61, until
it snaps free. Be careful of the sharp burrs left on either side of the drive bay.
With the RF shielding plate removed, slide the optical drive into the bay, as
shown in Figure 5-62.
Secure the optical drive with at least four screws, two per side, as shown in
Figure 5-63.
We used the third SATA power connector from the cable we connected to the
hard drives in the top two bays. If necessary, run a SATA power cable from the
power supply chamber outside and along the right side of the case and up to
the top drive bay area, and pass it into the main chamber through an access
cutout near the optical drive. Align the L-shaped key on the power cable con-
nector with the mating key on the drive power connector, and press the pow-
er cable connector firmly onto the drive connector, as shown in Figure 5-64.