Hardware Reference
In-Depth Information
With the processor and CPU cooler installed, the next step is to install the
memory modules. To begin, open all eight of the memory slot latches by piv-
oting them outward and down, away from the memory slots, as shown in Fig-
ure 4-32.
The DH55TC motherboard has four memory slots that accept 240-pin DDR3
memory modules. These slots are arranged in two channels, each of which
accepts two DIMMs. Channel A is the pair of slots nearest the processor, and
Channel B the two slots nearest the main ATX power connector (visible at the
bottom left of Figure 4-33). The blue slot is DIMM 0 for each channel, and the
black slot is DIMM 1.
If you are installing a matched pair of memory modules, install them in the two
blue (DIMM 0) slots. If you are installing four DIMMs in two matched pairs that
differ from each other, install the larger matched pair in the two blue (DIMM 0)
slots and the smaller matched pair in the black (DIMM 1) slots. (Obviously, if all
four DIMMs are identical it doesn't matter which DIMM goes in which slot.) If
you are installing three DIMMs comprising a matched pair and one odd DIMM,
install the matched pair in the two blue (DIMM 0) slots, and the third DIMM in
either black (DIMM 1) slot.
In any case, install the DIMMs that will occupy the slots nearest the processor
first and work forward toward the edge of the board. Before touching a DIMM,
ground yourself by touching the power supply or chassis frame. Hold the first
DIMM vertically over the appropriate slot. Align both edges of the DIMM with
the slots in the vertical posts on the sides of the DIMM slot. DDR3 DIMMs are
keyed with an off-center notch on the bottom (contact) edge of the DIMM.
Make sure this notch aligns with the corresponding post in the slot, and then
slide the DIMM into position, as shown in Figure 4-33.
Figure 4-32.
Open the memory slot latches
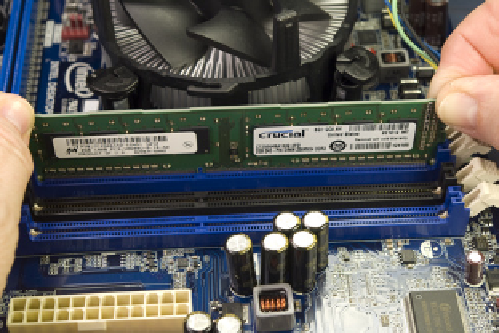
Figure 4-33.
Holding the DIMM vertically, align it with the slot and
key and slide it into position
Once the DIMM is aligned properly, seat it by placing one thumb on each
side of the DIMM and pressing down firmly until you feel it snap into place,
as shown in Figure 4-34. Although it's better to seat the DIMM by pressing on
both ends simultaneously, if you can't get the DIMM to snap into place this
way, you can press down first on one end and then the other until it seats com-
pletely. Repeat this procedure to install any remaining DIMMs.