Hardware Reference
In-Depth Information
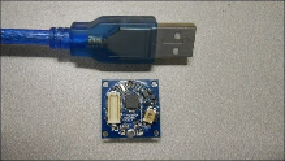
image of the TinyDuino processor board with a standard USB connector to give you some
idea of the size:
You'll need to order the USB programmer board as well so that you can program your
TinyDuino. You'll also need some other additional pieces to complete this project. The
Hexbug operates by controlling two motors. The first motor spins the top of the device,
and when it stops, the spider will go in the new direction as defined by the new location.
The other motor moves the spider forward and backward. Although the motors can go
both directions, the motor that moves the top of the device goes a full 360 degrees, so you
can drive both motors in the forward direction and your Hexbug can still go in any direc-
tion you'd like it to go. So, you can drive the Hexbug directly from Arduino (although if
you'd like, you can add the motor driver board from TinyCircuits). You will need a proto
board so that you can connect to the motors and access the sonar sensor. The TinyDuino
provides one of these as well. You'll stack this on top of the TinyDuino and the USB inter-
face board.
Perform the following steps to add Arduino to the Hexbug:
1. The first step is to open up the spider and disconnect the control board. Do this by
first unscrewing the top plate in the same way you'd unscrew it to change the bat-
teries on the spider. Then, take out the three screws that are part of the top plate
and expose the insides of the robot. You'll find a small controller board with six
connections. Two of these connections, the white and black wire combinations,
go to the two motors that control the direction and the forward/backward motion
of the spider. From the top plate comes a red and black wire that supplies the
power. Cut these wires. This is what the bottom part of the robot should now look
like: