Hardware Reference
In-Depth Information
on the Circuits@Home libraries. The header that needs to be included is
AndroidAccessory.h
. The object is of type
AndroidAccessory
and can be named anything; it has some information that is declared upon object creation. The data
that is declared when the
AndroidAccessory
object is created is for identification to any Android device that the board is
connected to, thus registering the Arduino to a particular application. The data is enclosed in parentheses and separated
by commas after the object's name. The declared data is ordered and defined as manufacturer, model, description,
version, Uniform Resource Identifier (URI), and serial. The data is represented as a character string and can be any
reasonable number of printable characters. It's always available to the connected Android device. The manufacturer,
model, and version are used to identify the accessory to a program on the Android device. The rest of declaration
information can be used for tracking and debugging reports in applications for widespread or commercial use.
The accessory is started the same way as software serial: by calling
name.begin
in the
setup
function of the
Arduino sketch. The object's public functions—
available
,
write
,
peek
, and
flush
—perform the same work as
their serial or software-serial counterparts, along with
print
and
println
. There are two other functions to note
when working with the
AndroidAccessory
library. One is
isConnected
, which returns a Boolean for the status of
the connection between Arduino and Android. The last added function is
refresh
; it's used to reset and reinitialize
the connection between the two devices after the devices have been reconnected. If the Arduino code checks for a
connection from the
isConnected
function, it will also call
refresh
to try to reestablish the connection every time
isConnected
called. The use of
refresh
or an
isConnected
check in the Arduino code's main loop creates the ability
to connect devices without having to power-cycle or rest the Arduino.
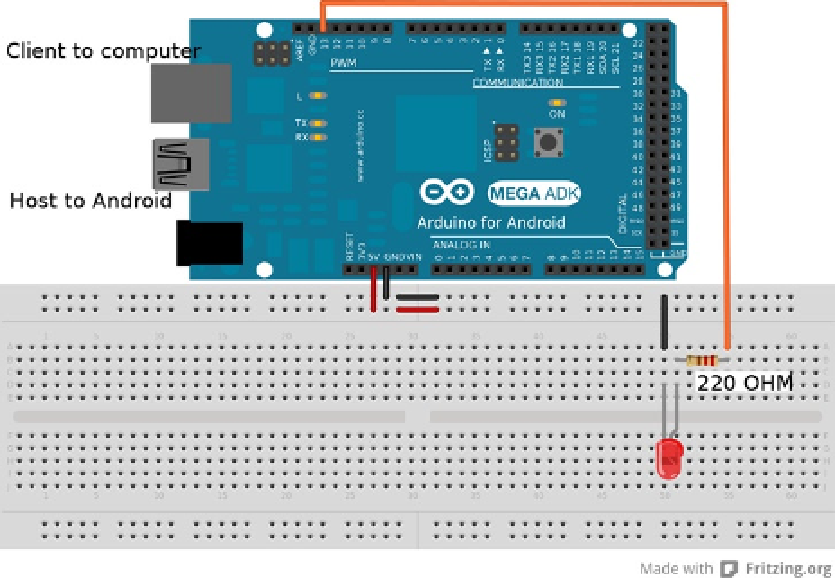
The first example sets up an LED to change state on the Arduino when a virtual button on the Android device
is pressed. The Arduino is set up as per Figure
4-5
, with an optional LED connected to Arduino pin 13. The code
accomplishes the state change by receiving a
1
to turn on the LED and any other byte value from the Android device to
turn it off. The code also implements the
refresh
function to allow for reconnecting the two devices without resetting
the Arduino.
Figure 4-5.
Arduino-to-Android configuration