Hardware Reference
In-Depth Information
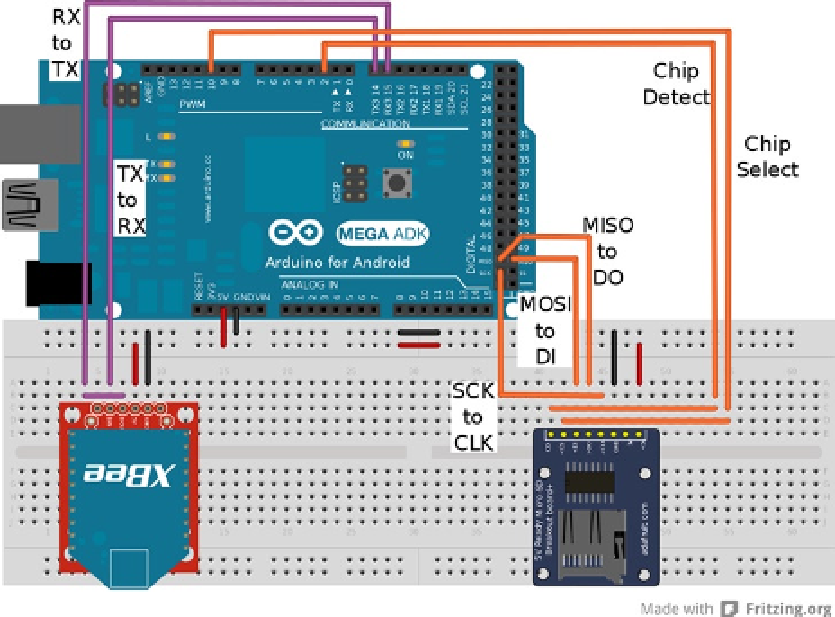
Figure 8-1.
Arduino setup for sensor log node
As shown in Figure
8-1
, the XBee module is connected to serial 3 on the Mega ADK; other connections are TX
to RX and RX to TX, with the 5V and GND pins connected accordingly. On the SD adapter, the DI and DO pins are
connected to the MOSI and MISO pins on the Mega ADK, CLK is connected to SCK, CS is connected to Arduino
pin 10, and CD is connected to pin 2.
Set up the Arduino Mega ADK as shown in Figure
8-1
, with the XBee module configured as the router and
inserted in the serial adapter, and the coordinator plugged into the USB adapter. Individually testing each component
attached to the Mega ADK before developing the code is vital to ensure that the hardware will not present many
problems in the debugging stages. To test that the SD card can read and write, open the
ReadWrite
sketch in
File
➤
Examples
➤
SD and add the line
pinMode (53, OUTPUT);
to make sure the slave select pin will not pull the
Arduino out of SPI master mode. Change the line
if (!SD.begin(4))
to
if "(!SD.begin(10))"
to map the SD card
to the chosen slave-activation pin. Insert an SD card into the adapter and upload the
ReadWrite
sketch to the board.
Start the serial monitor at baud 9600 and check that the sketch successfully runs.
To test the XBee modules, open the software serial sketch example and modify it to accommodate the serial of
the Arduino Mega ADK by changing all occurrences of
mySerial
to
Serial3
. Before uploading the sketch, remove the
#include
and
SoftwareSerial
code lines at the beginning of the program and change both baud rates to 115200 to
match the current XBee configuration. Once the programs is running on the Arduino, plug in the USB explorer to a
computer and start the X-CTU software, and try sending the HELLO packet from Chapter 5. The packet is
7E 00 13 10 01 00 00 00 00 00 00 FF FF FF FE 00 00 48 45 4C 4C 4F 7F
The packet should be entered into the packet assembly window in the terminal tab of the X-CTU software.
The packet should show up on the serial monitor with a few unreadable characters along with a readable “HELLO.”
You don't need to test the Android ADK functionality if you've already completed the corresponding exercise in
Chapter 5. The coding can begin for the sensor network components once the XBee and the SD card have been
successfully tested.