Game Development Reference
In-Depth Information
As the last step, you need to actually reference this new Level1.ccb in the GameScene.
This is done with the Sub File node.
You could just drag a Sub File node onto the stage and then edit its CCB File property to
point to the desired CCB file. But there's an easier way. Here's where the Tileless Editor
View on the left-hand Resource Navigator comes in handy.
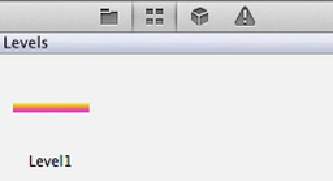
Open the GameScene.ccb by double-clicking it. Then select the Tileless Editor View tab
(second from the left) in the Resource Navigator pane. It'll list a single item named
Level1—that's the Level1.ccb—along with a preview thumbnail image as shown in
Fig-
Figure 2-23
.
Tileless Editor View with a thumbnail image of Level1.ccb contents
Note
The thumbnails are updated only when a CCB is saved or the project is
published. If you don't see a thumbnail or it shows the wrong preview image,
try publishing the project once. Confirm to Save All documents if SpriteBuilder
asks.
You should drag and drop the Level1 item from the Tileless Editor View to create a Sub
File node that references the Level1.ccb file's contents. If you inspect the new node's Item
Properties tab, you'll see a CCB File entry that references Levels/Level1.ccb. In the
Timeline, this new node is labeled CCBFile. You may want to double-click it and give it a
recognizable name—for instance, “level content.”
Because the Sub File node has a position of its own and the referenced Level1.ccb is
treated like a child of the Sub File node, you need to change the new node's position to
0,0 so that the dummy Level is properly aligned with the lower-left corner of the screen.
Also, the “change scene” button is now being drawn underneath the level content—just
drag the CCButton entry in the Timeline below the “level content” node as described
earlier.

Search WWH ::

Custom Search