Game Development Reference
In-Depth Information
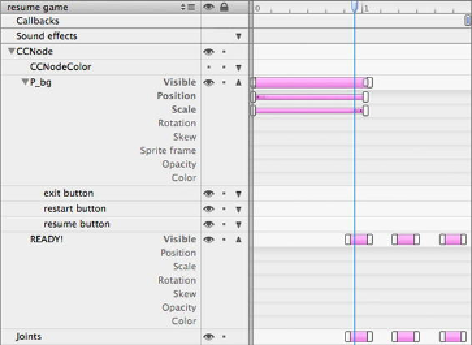
Figure 6-9
.
An example for the resume game Timeline with a blinking READY! label
If you also want to add some kind of ready indicator, drag and drop a
Label TTF
node
from the
Node Library View
onto the stage. This node should be a child of the root node
but
not
a child of the
P_bg
sprite. Change the label's text to
READY!
, and increase its
Font size
to
100
. Feel free to edit any other label properties as you see fit. But do uncheck
the label's
Visible
check box at the very top of the properties tab so that it starts out ini-
tially hidden. You should also change the label's position types to % and values to
50
so
that it is centered on the stage.
With the new label still selected, move the Timeline Cursor to about the 1-second mark,
and then press
V
. Move the Timeline Cursor to the right, and press
V
again. Repeat this
until you have about three equally spaced and sized
Keyframe Segments
as seen in
Figure
cing uneven. The important part is that the last keyframe should set the label's
Visible
property to
NO
. There will be a pink
Keyframe Segment
drawn between each two key-
frames where the label is visible.
If you play this animation, the menu will zoom out and move to the upper left, at which
point the
ready
label starts to blink three times. If you run this in the game, the game will
resume when the Timeline reaches the
Callbacks
keyframe.
As an exercise for you, add three additional
Callbacks
keyframes at the same time stamps
where the label becomes visible. Use the same selector
updateReadyCounter
for
Search WWH ::

Custom Search