Hardware Reference
In-Depth Information
Getting support for your Gentoo system is not as easy as you would hope; after all, everyone has a slightly
different install configuration and different use flags. In this respect, community support for a packaged version
distribution will be much better. Gentoo teaches you to understand your system and then you can better support it
yourself when you know where every little application and setting have been configured.
Gentoo's sourced based system makes it an ideal distribution to port to other architectures because there no
longer is a need to cross compile: you already have a working tool chain in your initial build environment. Gentoo
also sets up the GCC right at the start of the configuration of your build so that you have an optimized GCC binary for
your target architecture. Gentoo takes full advantage of this with the Raspberry Pi by enabling hard-float and link-time
optimization.
Installing Gentoo
The installation of Gentoo is not as simple as extracting an image and writing it to the SD card. If you wanted to make
an image of your finished Gentoo install, that method would work though. Nor will this install of Gentoo be like a
traditional install. You will do most of the installation from your host machine and the cross compile environment you
configured in Chapter 6.
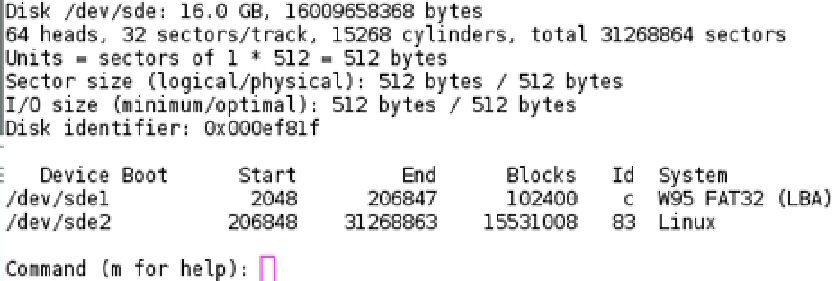
I use a 16-GB SD card for my Gentoo install; you could easily get away with a 4-GB card but given that SD cards
are cheap in Hong Kong I've gone for bigger ones. The first task you're going to need to do is to create the partitions for
the Gentoo installation. At a bare minimum you're going to need two partitions:
•
The boot partition, which is fat32
•
A root partition that can be EXT4 or another Linux filesystem of your choosing
I will be using
fdisk
under Linux to create my partitions but nothing stops you from using any tool you want.
Figure
11-23
shows my partition layout.
Figure 11-23.
Gentoo partition layout
Next, format the partitions in their respective filesystem formats. For the boot volume (
sde1
), I used the following
command:
# mkfs.vfat -F 32 /dev/sde1
I then used the following command to make the EXT4 filesystem on the second volume (
sde2
):
# mkfs.ext4 /dev/sde2

