Hardware Reference
In-Depth Information
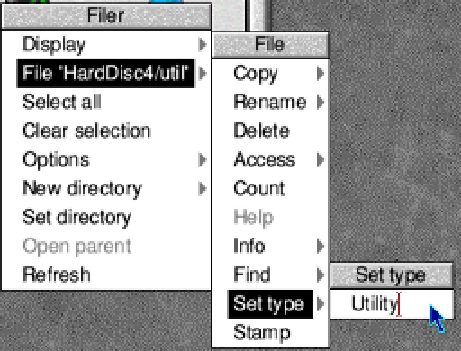
Figure 11-3.
Setting the metadata in the WIMP interface
One very nice thing about ADFS that some other operating systems have made use of recently is a loop-style
device to mount archived filesystems. For example, when you double-click a zip file in a recent version of Windows
it will open up the contents of the archive. RISC OS and the ADFS have been able to do this for many years. This all
comes back to the WIMP interface: the end user should not need to go into a command line and extract the files from
the archive and then view them. The WIMP approach is to make all of that seamless, and the archive just opens up
for the user and provides access to exactly what is needed. This is the loop filesystem working in the background to
mount the zip file as a working filesystem for you.
Now what would happen if you were to copy your Nginx
error.log
file into your RISC OS system? RISC
OS already knows it's a little different from other operating systems and will change the extension on the file
automatically to help you out. If you were to copy your
error.log
into the
Mystuff
directory from Table
11-1
, your
RISC OS system would save the file as
ADFS::HardDisc4.$.Mystuff.error/log
. You may need to set the metadata
on the file if RISC OS cannot automatically recognize the file type (this only needs to be done once).
The ADFS implementation is also very modular. The entire filesystem stack consists of three modules each with
a very special task.
•
The module ADFS is responsible for block access and user interface interaction.
•
The FileCore module is responsible for the actual filesystem on disk behind the ADFS module.
•
The Fileswitch module gives out access to the application programming interface (API).
This all makes for a very stable filesystem stack. Because of the modular system it makes it very simple for other
developers to port their filesystems to RISC OS. Sadly not many people have ported filesystems, given RISC OS's
limited popularity.
All of this is starting to sound quite interesting. It's time to get the image and create your SD card.
Installing RISC OS
Point your browser to
http://raspberrypi.org/downloads
and select the RISC OS download image. At the time
I wrote this, the image was called
RiscOS-2012-11-01-RC6.zip
.
Once you have this file downloaded, extract it from the zip archive to a temporary directory on your host
machine. Once it is extracted, you will notice there is no installer, just the image file and a text file. You are going to
need to write this image file to your SD card by using the
dd
command.