Database Reference
In-Depth Information
Graphic Formatting
In
Chapter 3
you learned how to put pictures, sounds, QuickTime data, and files into contain-
er fields. Remember that with pictures and QuickTime data, FileMaker actually shows the
content right on the layout. When you design that layout, you have some control over how
that content is displayed (see
Figure 8-17
).
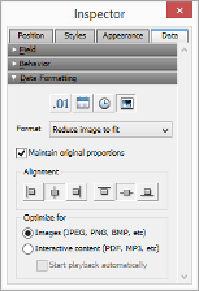
Figure 8-17. Using the Inspector's formatting options, you can tell FileMaker to shrink or enlarge
a picture to fit the field boundaries, or to crop it—showing only what fits. You also get to decide
where the picture lives inside the field, or what part gets cropped. If you don't mind wildly skewed
images, you can also tell FileMaker to stop keeping your pictures properly proportioned.
NOTE
If someone puts a file (Insert→File) in your container field, then you have no control over how
FileMaker displays it. FileMaker automatically shows the appropriate icon and leaves it at that.
The pictures and movies you put in the field may not always be exactly the same size and di-
mensions as the field control itself, so FileMaker has to decide how to make things fit.
Should it shrink a big picture down so it all shows, or let it get cut off on the edges? For a
tiny picture, should FileMaker blow it up to use the available space, even though it may look
a little blocky? For that matter, should it stretch and skew the image willy-nilly to force a fit,
or leave some of the field empty? FileMaker lets you decide. With the graphic format options
(the rightmost button in the Inspector's Data Formatting Section), you can control scale, pos-
ition, and proportions.