Database Reference
In-Depth Information
click in a portal row first to set up the context so FileMaker knows which related record you
want to delete.
1.
Click in any field of the portal row you want to delete
.
You'll see the insertion point blinking in the field you clicked in.
2.
Choose Records
→
Delete Record
.
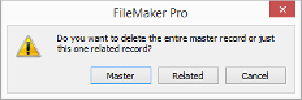
The delete master or related record warning appears (
Figure 4-14
).
Figure 4-14. Just clicking in a field on a portal row doesn't give FileMaker enough inform-
ation about context, so it asks you which record you want to delete. If you click Master or
Related (but not Cancel), you'll get a second window asking if you're sure you want to de-
lete the record.
3.
Click Related
.
A warning dialog box appears, giving you a chance to change your mind and keep the
record instead of deleting it.
4.
Click the Delete button
.
The related record is deleted.
The terms
master
and
related
are FileMaker-speak for
parent
and
child
. If you're not on a
portal row at all—neither an active field nor a portal row highlight—the Delete Record com-
mand works exactly as it does on a layout that has no portals. That is, you'll delete the
Master (or parent) record.
There's a way to avoid dealing with two different warning dialog boxes when you want to
delete a related record. You have to select the whole portal row instead of just clicking in a
field (
Figure 4-15
). Click between the fields in a portal row instead of in one of its fields.
When the portal is highlighted, choose Records→Delete Record. FileMaker now knows that
you want the related record deleted and it skips right to a warning dialog box that asks if you
want to permanently delete the
related
record. Click Delete, and the payment record is gone.