Graphics Programs Reference
In-Depth Information
Therefore,
ItemsViewController
will be responsible for creating the instance of
DetailViewController
and adding it to the stack. At the top of
ItemsViewCon-
troller.h
, import the header file for
DetailViewController
.
#import "DetailViewController.h"
@interface ItemsViewController : UITableViewController
When a row is tapped, its delegate is sent
tableView:didSelectRowAtIndexPath:
, which contains the index path of the
selected row. In
ItemsViewController.m
, implement this method to create a
De-
tailViewController
and then push it on top of the navigation controller's stack.
@implementation ItemsViewController
- (void)tableView:(UITableView *)aTableView
didSelectRowAtIndexPath:(NSIndexPath *)indexPath
{
DetailViewController *detailViewController = [[DetailViewController alloc] init];
// Push it onto the top of the navigation controller's stack
[[self navigationController] pushViewController:detailViewController
animated:YES];
}
Build and run the application. Create a new item and select that row from the
UIT-
ableView
. Not only are you taken to
DetailViewController
's
view
, but you
also get a free animation and a button in the
UINavigationBar
titled
Back
. Tap this
button to get back to
ItemsViewController
.
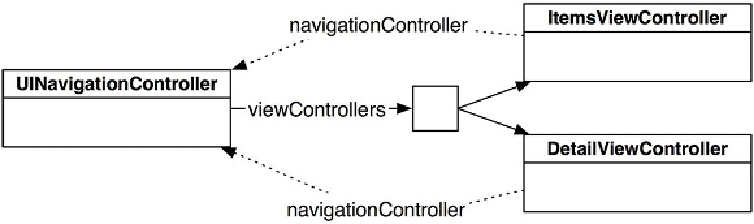
Since the
UINavigationController
's stack is an array, it will take ownership of
any view controller added to it. Thus, the
DetailViewController
is owned only by
the
UINavigationController
after
tableView:didSelectRowAtIndexPath:
finishes. When the stack is popped,