HTML and CSS Reference
In-Depth Information
Planning the Game
Using the physics components built in this chapter, the idea behind the cannon game is quite simple: Throw
some round objects around the page trying to hit some small round targets.
The game uses the location of a touch to control the angle of the cannon and release a cannon ball whenever
the touch is released. (On a desktop
mousemove
and
mouseup
events are used.)
The cannon is a polygon sprite that won't have the physics component enabled, so it can move and adjust as
necessary. It fires
Q.CannonBall
sprites that have physics enabled, so they can collide with everything else.
Finally, the
Q.Target
object is just a small, pink ball that has physics turned on. It listens to its
contact
event and checks if the object it is in contact with is a
Q.CannonBall
. If it is, it can destroy itself and update
the counter of the number of targets left on the page. When that number reaches 0, it restarts the level. In a real
game it would be time to move to the next level. Check out
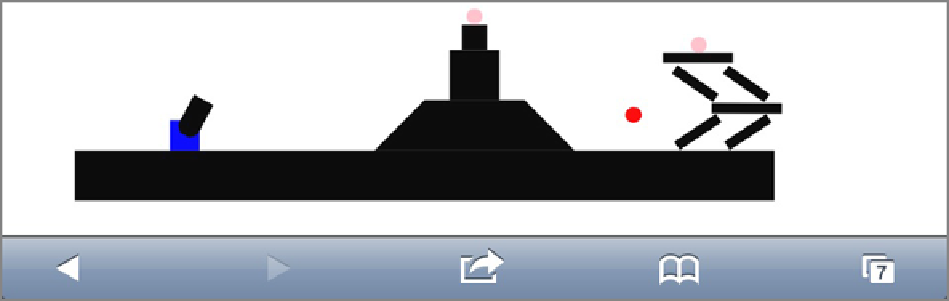
Figure 14-5
for an in-game screen shot.
Figure 14-5:
The final SVG Cannon shooter.
Building the Necessary Sprites
It's time to create the final game code. Open
cannon.js
and rip out all the existing code. The first pieces
of code needed are the three sprite classes described in the last section: the
Q.CannonBall
, the
Q.Cannon
,
and the
Q.Target
. Add the code in
Listing 14-12
to the top of the
cannon.js
file, below the initial Quintus
setup code.
Listing 14-12:
Cannon sprites
$(function() {
var Q = window.Q = Quintus()
.include('Input,Sprites,Scenes,SVG,Physics')
.svgOnly()
.setup('quintus',{ maximize: true });
Q.CannonBall = Q.Sprite.extend({
init: function(props) {
this._super({
shape: 'circle',