Graphics Reference
In-Depth Information
7
'Ctrl
click' on layer
4's Position property,
then press 'Enter' and
rename the layer as
'
Shadow
'.
8
Right-click on the
Shadow layer (layer 4)
and select
Effect
Blur & Sharpen
Fast Blur
.
9
In the Effect Controls window, adjust the
Blurriness
to 11.
To make the shadow affect only the Earth's surface, we'll use the
Earth Roll
-
Alpha.mov
as a Track Matte.
10
Duplicate layer 1 (Ctrl
D), then drag the copy down to place it above
Logo Rise Text 4
(layer 5).
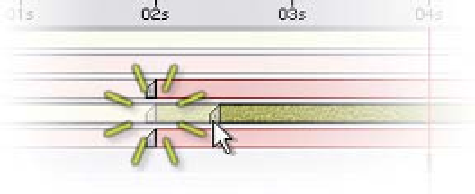
11
Click on the left In Point handle of layer 4 on the Timeline and drag it
towards 2:00.
As you drag the In Point
handle, press and hold the
'Shift' key to activate the
'Snap To' function. As you
get close to the 2-second
mark in the Timeline, the In
Point will Snap align to the
same In Point of the other two
Logo Rise Text
layers. The 'Snap To' align
feature works for Keyframes and layer Timelines alike.
12
Drag the Out Point handle to match the Out Point of layer 5.
13
Apply the
Track Matte Luma Matte
to layer 5.
14
On layer 5, change the Blending Mode from Normal to Multiply and set
the layer's Opacity (T) to 66%.
Save your work as
Logo Risen.aep
, then create a Preview to view the finished
project. If the project takes too long to render, try reducing the Comp