Graphics Reference
In-Depth Information
Notice that next to each of the Transforms (Audio included) is a
little blank stopwatch. Clicking them 'on' makes that item
animatable and inserts a Keyframe into the Timeline at the
position of the CTI.
Click on both the
Position
and
Rotation
stopwatches to create new
Keyframes. Notice in the Timeline
where the CTI is positioned, two
diamonds will appear. Also, in the A/V
Features column of the Timeline
Window you'll see that two new
check-boxes have appeared. A check
indicates that the CTI is positioned over a Keyframe applied to that
Transform.
Press 'Ctrl
G' to bring up the
Go To
Window - type '1.' (number 1 followed
by a single decimal point), then press Enter. This is another favorite shortcut of
mine - simply typing the number 1 with one decimal point is interpreted by
After Effects as meaning the same as '0:00:01:00' but takes far fewer
keystrokes. Likewise, if you had typed '1..' the CTI would have jumped to
'0:01:00:00' and so forth. To go to '0:00:09:09' you would type '9.9' - this only
works in SMTPE Timecode and Film Footage display modes.
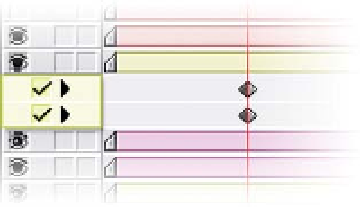
Return the CTI to '0:00:01:00'. Now the check-boxes are both empty and have
little black arrows pointing backwards. To create a new Keyframe, either click
inside the boxes or just manually change one of the corresponding values to a
different number, thus forcing a new Keyframe. You should see something like
the image below.