Graphics Reference
In-Depth Information
However, Timeline Independent Resources can pose considerable difficulty with
their extension. Our background layer, for instance (
CloudsLoop.aep
), only lasts
12 seconds. Earlier we determined that the last 4 seconds of the logo build
needed to loop so the client can extend the end indefinitely. Fortunately for us,
the Clouds already loop every 4 seconds - all that needs to be done is to
extend the clip in the Project Window.
4
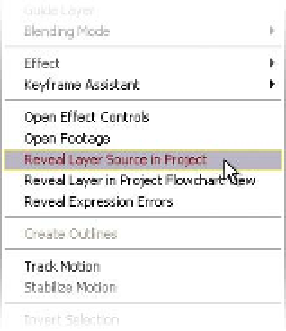
Right-click on the
CloudsLoop.mov
layer.
5
Select from the pop-up menu
Reveal
Layer Source in Project
.
6
Press 'Ctrl
F' to open the Interpret
Footage dialog.
7
Change the Loop Times to 4, then click
'OK'.
8
Snap the
CloudLoop.mov
layer's Out
Point to the Timeline's end.
Return to the Timeline Window and the CloudsLoop background now extends
past the last frame. Repeat the same procedure for the
Hair-16.mov
clip; for this
only two loops are necessary - the loop point for the Hair doesn't matter
because the clip's animation is so disjointed already.
Precomps suffer a problem that other Timeline Dependent Resources
do not - Precomps are Timelines and therefore do not have an Interpret
Footage Loop Times option. The easiest method for looping Timelines inside
Precomps is to make either Precomps of your Precomps or duplicate layers
of the layers within your Precomps. It's your choice - but I prefer to make
Precomps of Precomps.
9
Select
CH Elements build
- press 'Ctrl
Shift
C' and select
'Move . . .' and check 'Open New . . .'.
10
Append the name to
CH Elements build Loop
, then press 'OK'.
11
Duplicate the layer only once, then go to 6:00.