Graphics Reference
In-Depth Information
in the Comp Window. If you've used a vector illustration program, or
Photoshop's Pen Tool, this tool's functions should be familiar. In After Effects it
is used in both Masks and Paths alike.
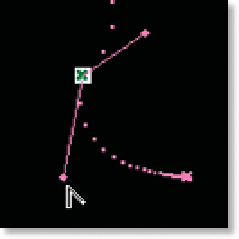
Open the Position properties for the
Spatial
layer. With the Path for
Spatial displayed in the Comp Window, float the Pen cursor over the
layer's path. As you move the cursor over the Path the icon changes
to the Add Vertex Tool. Click anywhere on the Path to add a vertex (a
corresponding Keyframe in the Timeline will be added at the same time), then
drag the cursor around the screen to extend the Bezier handles and make the
Path more distorted.
Notice when you add
a vertex to the Path
that the spacing of
the dots remains
unchanged (unless
you physically drag
the new vertex's
handles after you've
added it). This is because adjusting the Path only affects the Spatial Interpolation
of the layer's Keyframes. To influence the spacing of the Path's dots you have to
alter the Temporal Interpolation. Select the last Keyframe of the
Spatial
layer and
make it an Easy Ease In (Shift
F9). Closely examine the Path and you'll see that
the dots have shifted, placing them more closely spaced as they approach the
final Keyframe while expanding away from the opposite Keyframe. This is the
visual representation of how a smooth Ease In will affect a layer's motion.
Converting Vector Interpolation
Every vertex can be quickly altered from one
type of Interpolation to another. With the
Pen Tool active, float the cursor over a vertex
and the icon changes to the Convert Vertex cursor.
Clicking on a vertex causes it to reset to either
Auto Bezier or Linear, while click and dragging on a
vertex assigns a Continuous Bezier function with
the handle lengths reflecting each other.