Graphics Programs Reference
In-Depth Information
7.
In the second column of the Properties panel, change the angle to 270.
This will force the gradient to fade from color 250 at the top to white at
the bottom.
8.
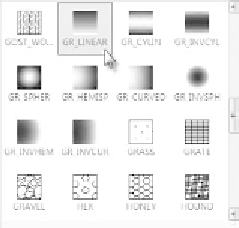
Expand the Pattern panel and choose GR_LINEAR, as shown in
Figure 11.14.
FiGuRE 11.14
Selecting the linear gradient type
9.
Click the Select Boundary Objects button on the Boundaries panel of
the contextual Hatch Creation tab, and then click the three rectangles
that you drew.
Using the Select Objects option, you can select closed polylines,
circles, or ellipses as the boundary objects. The hatch inserts imme-
diately after you select the object.
TIP
an automatic preview is not displayed when you insert hatches by
object. Instead, the hatch inserts immediately after selecting the object. If
you accidentally choose the wrong object, press and hold the Shift key and
select the boundary object you want to remove.
10.
With each of the hatches in place, press
↵
to end the
HATCH
command.
11.
When creating hatches, AutoCAD may not always initially display the
result properly. Enter
REA
↵
to run the
REGENALL
command, which forces
AutoCAD to reevaluate the drawing and refresh the drawing area. Your
gradients should look like Figure 11.15. The gradient obscures the win-
dows, but you'll fix that in the next couple of steps.


Search WWH ::

Custom Search