Graphics Programs Reference
In-Depth Information
You'll leave the Border properties at their default settings. These
control the visibility of the horizontal and vertical lines of the table,
their lineweights, and their colors. Your profession or discipline
might have its own standard for these parameters.
13.
In the General section, on the left side of the dialog box, make sure
Table Direction is set to Down. Click OK to save the new table style.
14.
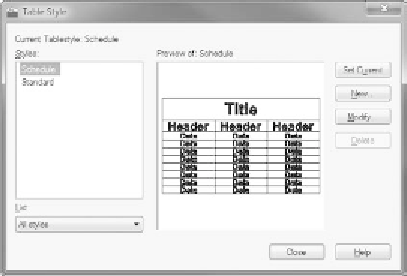
Back in the Table Style dialog box, in the Styles list, click Schedule to
highlight it, and then click the Set Current button to make it the cur-
rent table style (see Figure 9.63). Click Close.
Now, let's look at the geometry of the new table.
FiGuRE 9.63
The Table Style dialog box with Door Schedule as the current table style
Designing a table
The parameters in the Schedule table style have set the height of the rows. You
now need to determine the width of the columns and figure out how many col-
umns and rows you need for the door schedule. You do this as you insert a new
table. Remember that Schedule is the current table style. Follow these steps:
1.
Zoom and pan so that you can see the area below the cabin. The table
won't fit inside the title block perimeter, but I'll show you how to give
it its own title block in Chapter 14, “Using Layouts to Set Up a Print.”
2.
In the Annotate tab's Tables panel, click the Table button to open the
Insert Table dialog box (see Figure 9.64).


Search WWH ::

Custom Search