Graphics Programs Reference
In-Depth Information
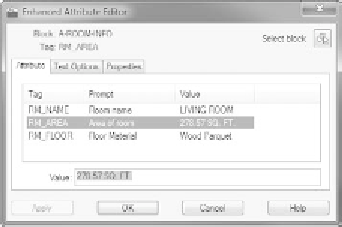
FiGuRE 9.32
Select the RM_AREA row in the Enhanced Attribute Editor.
3.
Double-click the 278.57 SF (26.20 M2) value with the gray background
at the bottom of the dialog box to open the Field dialog box, where you
can edit the preferences and references.
4.
Inside the Field dialog, click the Select Object button near the Object
Type field.
Both dialog boxes disappear and the cursor turns into a pickbox.
Select the polyline that follows the perimeter of the bathroom.
5.
If you're using metric units, click the Additional Format button when
the Field dialog box reappears; then repeat steps 11 and 12 from the
previous exercise.
6.
Click OK to close the Field dialog box and return to the Enhanced
Attribute Editor dialog box. Select the RM_NAME row and then, at
the bottom of the dialog box, highlight LIVING ROOM and enter
BATH
to replace the text. Change the floor material to
Tile
.
7.
Click OK to close the dialog box. The revised BATH attribute is now
properly placed in the drawing.
8.
Repeat steps 1 through 7, substituting
KITCHEN
,
FRONT DECK
, and
BACK DECK
for the room name attribute and selecting the appropri-
ate polyline as a reference for each block.
There are no node point objects for the deck text, so you can just
rotate and place the attribute a little left of center on the appropri-
ate deck. For the decks, change the floor material to
Cedar Planks
.
Metric users will need to open the Additional Format dialog box for
each block and add the conversion factor and suffix for each block.
When you are done, your cabin should look like Figure 9.33.

Search WWH ::

Custom Search