Graphics Programs Reference
In-Depth Information
3.
After you complete your selection using a crossing window, the back
door and its swing highlight (dash) to indicate they are selected.
Additionally, the Quick Properties panel reappears to display the
number of objects selected.
Since you selected more than one type of object (a polyline and
arc), the Quick Properties panel reads “All (2)” as opposed to listing
the specific type of object selected. AutoCAD will only list the specific
type of object selected if everything selected is of the same object
type; a set of polylines, arcs, lines, and so on.
4.
Move to the bathroom, and select its door using another crossing window
(with the back door still selected), as shown at the bottom of Figure 6.23.
To do this, use the crosshair cursor to click in the clear space
below the door, starting a new crossing window. With your crossing
window (green with a dashed border) started, proceed to move your
cursor up to select a point that crosses the bathroom door and swing
without crossing any wall lines or any of the fixtures (see the bottom
of Figure 6.23). The bathroom door and swing are selected, and the
quantity listed in the Quick View Properties palette updates.
5.
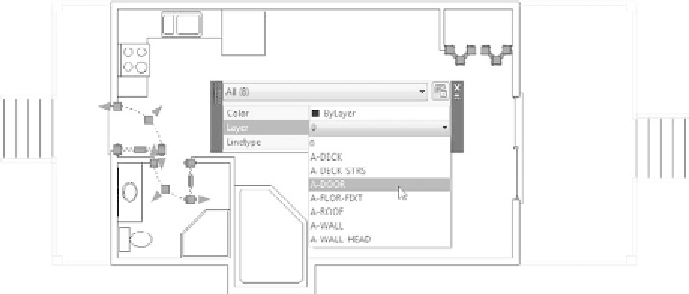
Select the four rectangles that make up the closet doors; then open
the Layer drop-down list from either the Layers panel or the Quick
Properties panel and select the A-DOOR layer, as shown in Figure 6.24.
All of the doors you selected have been moved from layer 0 to the
A-DOOR layer, and now display in red (the color assigned to the A-DOOR
layer). Press Esc to deselect the objects and remove the grips.
FiGuRE 6.24
Using the Quick Properties panel's Layer drop-down list to change the
layer of the door objects

Search WWH ::

Custom Search