Graphics Programs Reference
In-Depth Information
6.
Using the Endpoint osnap, select the hinge point.
The arc is now visible, and its endpoint follows the cursor's movement,
but the arc is extending in the wrong direction (see the top image in
Figure 4.51). The prompt displays the Specify Included Angle option.
7.
Enter
-90
↵
. The arc is completed, and the
ARC
command ends (see
the bottom image in Figure 4.51).
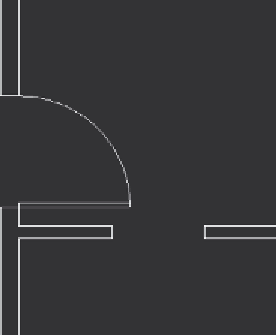
FiGuRE 4.51
Drawing the arc: the ending point of the arc follows the
cursor's movements (top), and the completed arc (bottom).
WARNING
In this situation, the arc must be created by selecting
the jamb end first and the door end later. Arcs are made in a counterclockwise
fashion, so selecting the door end first and the jamb end later would result in
a 270° arc that extends behind the door and through the external wall.


Search WWH ::

Custom Search