Agriculture Reference
In-Depth Information
Pour the melted wax through the final filter, shown here secured with clothespins. Protect
your surface, and place the container with the clean wax on a hot plate switched to the
warm setting, if needed.
Choose the correct size wick. This may take some experimentation, but it's all part of the
learning process.
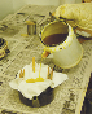
When the mold and wick are ready, fill the mold with barely melted wax. Top off the mold
with more melted wax if the bottom shrinks after cooling. After the wax is completely
cooled, carefully remove the candle from the mold.
Lift up the candle and pull enough wick into the mold to make another candle—this
trick eliminates the wick-threading task next time.
If the bottom of the candle is uneven, you can smooth it out. Warm a small pan with
aluminum foil on the bottom on the hot plate and rub the bottom of the candle until
smooth and even. Pour the melted wax back into your container. Your candle is finished
and ready to burn.
Before you start sharing these wonderful gifts with friends and family, or even
selling them, make sure they work. You'll have to test-burn a couple of each kind you
make to make sure the wax is clean and you have the right-sized wick. You don't need
to burn them completely if wax is in short supply, but use at least half when testing a
small candle.
If the candle burns with a steady, clean flame, and without smoke, drips, or sputter-
ing, you can be fairly certain you've chosen all the right ingredients. But if it doesn't