Graphics Reference
In-Depth Information
Tutorial A.1. Simple Example with Lighting Computation
Tutorial A.1.
Project Name:
D3D
_
SimpleLighting
Library Support:
UWB
_
MFC
_
Lib1
•
Goal.
Examine how to work with the illumination model.
•
Approach.
Implement a simple program independent of the
UWBGL
to
demonstrate the effect of lighting computation.
Figure A.1 is a screenshot of running Tutorial A.1. This program is similar to
Tutorial 14.1 where the source code is independent of the
UWBGL
library. However,
this tutorial includes three extra checkboxes at the lower part of the application
window. Each of these checkboxes controls the on/off switch of the corresponding
light source. By switching each of the light sources on, we can observe that the
point light is green in color, the directional light is purple, and the spot light is
blue. All the changes from Tutorial 14.1 are in the
GrfxWindowD3D.cpp
file, in
the
OnPaint()
function.
UWBGL_D3D_Lib18
Change summary.
See p. 533
for a summary of changes to
the library.
This library includes support for working with the default Phong illumination
model. The new classes introduced by this library are
UWB
_
Material
and the
UWBD3D
_
Light
hierarchy.
UWB
_
Primitive
is modified to contain a
UWB
_
Material
as an attribute. This new attribute describes the material property of the prim-
itive. As in any other attribute, before rendering the primitive, the material at-
tribute is copied to the
UWB
_
DrawHelper
to be programmed into the graphics
API. To observe the results of illumination, a program should create instances
of
UWBD3D
_
Light
objects, initialize the
UWB
_
Material
, and enable the lighting
attributes of
UWB
_
Primitive
objects.
Tutorial A.2. Lighting with UWBGL
Tutorial A.2.
Project Name:
D3D
_
Lighting
Library Support:
UWB
_
MFC
_
Lib1
UWB
_
D3D
_
Lib18
•
Goal.
Demonstrate the support of the illumination model and lighting com-
putation in the
UWBGL
.
•
Approach.
Implement a simple program based on the
UWBGL
.
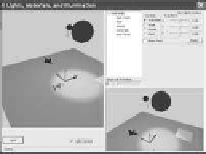
Figure A.2 is a screenshot of running Tutorial A.2. Notice the brighter circular
region in the middle of the rendered image; this is the illumination effect from a
spot light. You can bring up the “Light Control” window by clicking on the “Light
Control” checkbox. On the “Light Control” window, select the “Spot Light” radio
button and toggle the “On/Off” checkbox. Notice the circular region appear/dis-
appear with the on/off of the spot light. Now, click on the “Draw Lgt” checkbox
and see a blue sphere being drawn. This is the position of the spot light. In similar
fashion, we can switch on/off each of the point and directional lights and enable
Figure A.2.
Tutorial
A.2.


Search WWH ::

Custom Search