Graphics Programs Reference
In-Depth Information
3.
Release the mouse button. The door is highlighted (and again, you may see grips appear
at the lines' endpoints and midpoints).
4.
Click the Move tool again. Just as in the preceding exercise, the Specify base point or
[Displacement] <Displacement>: prompt appears.
5.
Pick any point on the screen; then enter
@1<0
↵. Metric users should enter
@3<0
↵. The
door joins with the arc.
The two selection windows you've just seen—the blue solid one and the dotted green one—
represent a standard window and a crossing window. If you use a
standard window
, anything
completely within the window is selected. If you use a
crossing window
, anything that crosses
through the window is selected. These two types of windows start automatically when you click
any blank portion of the drawing area with a Standard cursor or a Point Selection cursor; hence
the name
Autoselect
.
Next, you'll select objects with an automatic crossing window:
1.
Click and drag (or double-tap and drag) from a point below and to the right of the door.
As you move the cursor left, the crossing (dotted) window appears.
2.
Position the cursor so that the window encloses the door and part of the arc (see
Figure 2.24); then release the mouse button (or tap the trackpad). The entire door, includ-
ing the arc, is highlighted.
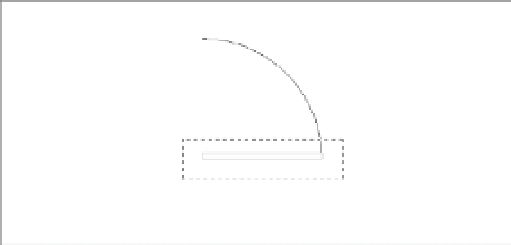
FIGURE 2.24
The door
enclosed by a
crossing window
3.
Click the Move tool.
4.
Pick any point on the screen; then enter
@1<180
↵. Metric users should type
@3<180
↵.
The door moves back to its original location.
You'll find that, in most cases, the Autoselect standard and crossing windows are all you
need when selecting objects. They really save you time, so you'll want to become familiar with
these features.
Before continuing, choose File
Save from the menu bar to save the Door.dwg file. You won't
want to save the changes you make in the next section, so saving now stores the current condi-
tion of the file on your hard disk for safekeeping.