Graphics Programs Reference
In-Depth Information
removal, you can view and print your 3D drawings so that solid surfaces are opaque. To view
a 3D drawing in the drawing area with hidden lines removed, use the Hide command or
use one of the visual styles other than wireframe. To print a 3D drawing with hidden lines
removed, choose the Hidden option or a visual style from the Shading pop-up menu in the
3D Viewports group.
Hide Paperspace Objects doesn't work for views in the layout viewport described in the sec-
tion “WYSIWYG Printing Using Layout Views.” Instead, you need to set the viewport's Shade
Plot property to Hidden. (Click the viewport, right-click, and choose Shade Plot
Hidden
from the shortcut menu.)
Print Upside Down
This option does exactly what it says. It adjusts the printout to print
upside down.
S
H A R I N G
The Sharing group features a Save Device Settings To option. When this option is turned on,
the changes you make to Print dialog box settings are saved to a specified file. You'll learn more
about layouts in the following section.
WYSIWYG Printing Using Layout Views
So far you've done all your work in the model view, also known as Model Space. There are other
views to your drawing that are specifically geared toward printing. The
layout
views enable
you to control drawing scale, add title blocks, and set up layer settings that are different from
those in the model view. You can think of the layout views as page-layout spaces that act like a
desktop-publishing program.
This section introduces you to layout views as they relate to printing. You'll learn more about
layout views in Chapter 15, “Laying Out Your Printer Output.”
You can have as many layout views as you like, each set up for a different type of output. You
can, for example, have two or three layout views, each set up for a different scale drawing or
with different layer configurations for reflected ceiling plans, floor plans, or equipment plans.
You can even set up multiple views of your drawing at different scales in a single layout view. In
addition, you can draw and add text and dimensions in layout views just as you would in Model
Space.
To get familiar with the layout views, try the following exercise:
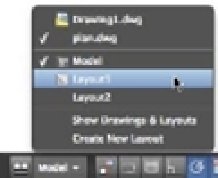
1.
With the Plan file open, click the Model/Layout tool in the status bar (see Figure 8.8) and
then select Layout1 from the pop-up menu. The Model/Layout tool now indicates that it
is set to Layout1.
FIGURE 8.8
Choose Layout1
from the pop-up
menu.