Graphics Programs Reference
In-Depth Information
Finding an Exact Distance along a Curve
To find an exact distance along a curve or to mark off specific distance increments along a curve,
do the following:
1.
Open a new drawing. Click the arrow from the Tool Sets palette to expand the Open
Spaces panel and then click the Point Style tool. You can also click Format
Point Style
from the menu bar or enter
DDPTYPE
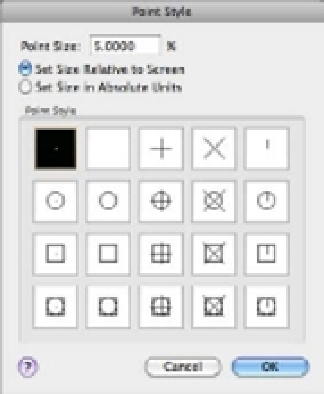
↵ to open the Point Style dialog box (Figure 6.29).
FIGURE 6.29
The Point Style
dialog box
2.
Click the X icon in the top row. Also be sure the Set Size Relative To Screen radio button
is selected. Then click OK.
You can also set the point style by setting the Pdmode system variable to 3.
3.
Click the Measure tool from the Tool Sets palette, choose Draw
Point
Measure from
the menu bar, or type
ME
↵.
THE DIFFERENCE BETWEEN DIVIDE AND MEASURE
Divide (choose Draw
Point
Divide from the menu bar) marks off a line, an arc, or a curve into
equal divisions as opposed to divisions of a length you specify. You might use Divide to divide an
object into 12 equal segments, for example. Aside from this difference in function, Divide works
exactly the same way as Measure.
4.
At the Select object to measure: prompt, click the end of the curve that you want to
use as the starting point for your distance measurement.
5.
At the Specify length of segment or [Block]: prompt, enter the distance you want. A
series of Xs appears on the curve, marking off the specified distance along the curve. You
can select the exact location of the Xs by using the Node Osnap override (see Figure 6.30).