Graphics Programs Reference
In-Depth Information
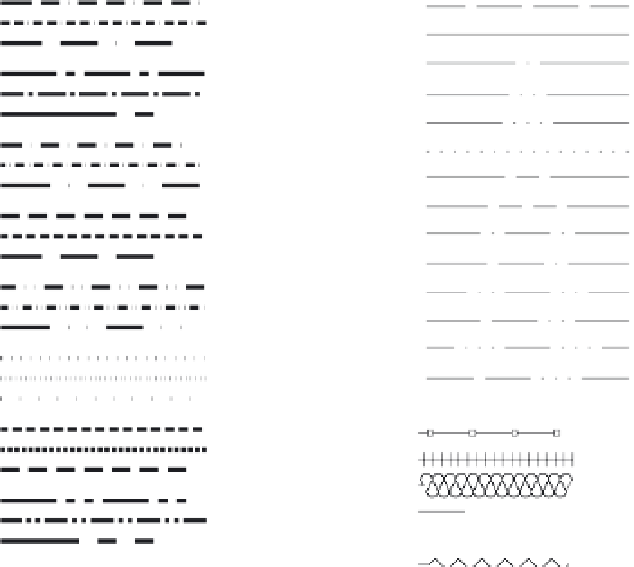
FIGURE 5.19
Standard, ISO,
and complex
AutoCAD
linetypes
BORDER
BORDER2
BORDERX2
CENTER
CENTER2
CENTERX2
DASHDOT
DASHDOT2
DASHDOTX2
DASHED
DASHED2
DASHEDX2
DIVIDE
DIVIDE2
DIVIDEX2
DOT
DOT2
DOTX2
HIDDEN
HIDDEN2
HIDDENX2
PHANTOM
PHANTOM2
PHANTOMX2
ACAD_ISO02W100
ACAD_ISO03W100
ACAD_ISO04W100
ACAD_ISO05W100
ACAD_ISO06W100
ACAD_ISO07W100
ACAD_ISO08W100
ACAD_ISO09W100
ACAD_ISO10W100
ACAD_ISO11W100
ACAD_ISO12W100
ACAD_ISO13W100
ACAD_ISO14W100
ACAD_ISO15W100
FENCELINE1
FENCELINE2
TRACKS
BATTING
HOT_WATER_SUPPLY
GAS_LINE
ZIGZAG
Adding a Linetype to a Drawing
To see how linetypes work, you'll add a DASHDOT line in the bathroom plan to indicate a
shower curtain rod:
1.
In the Layers palette, click the plus icon in the lower-left corner to create a new layer, and
then type
Pole
↵ to give the new layer a unique name.
2.
Select the Pole layer in the list, and then in the Properties Inspector palette, click the
Linetype option to open the pop-up menu.
If you're in a hurry, you can simultaneously load a linetype and assign it to a layer by
using the Layer command. In this exercise, you enter
-Layer
↵ at the Command prompt.
Then enter
L
↵,
DASHDOT
↵, and
pole
↵, and press ↵ to exit the Layer command.
3.
Select Manage from the pop-up list. The Select Linetype dialog box appears (see
Figure 5.20).
4.
The Select Linetype dialog box offers a list of linetypes to choose from. In a new fi le
such as the Bath file, only one linetype is available by default. You must load any addi-
tional linetypes you want to use. Click the Load button at the bottom of the dialog box
to open the Load Or Reload Linetypes dialog box. You can sort the names alphabeti-
cally or by description by clicking the Linetype or Description heading at the top of the
list (see Figure 5.21).