Graphics Programs Reference
In-Depth Information
Understanding the Annotation Scale
One common use for AutoCAD's block feature is creating
reference symbols
. These are symbols
that refer the viewer to other drawings or views in a set of drawings. An example would be a
building-section symbol on a floor plan that directs the viewer to look at a location on another
sheet to see a cross-section view of a building. Such a symbol is typically a circle with two num-
bers: One is the drawing sheet number and the other is the view number on the sheet (examples
appear a little later, in Figure 4.18).
In the past, AutoCAD users had to insert a reference symbol block multiple times to
accommodate different scales of the same view. For example, the same floor plan might be
used for a ¼˝ = 1´-0˝ scale view and a
1
⁄
8
˝ = 1´-0˝ view. An elevation symbol block that works
for the ¼˝ = 1´-0˝ scale view would be too small for the
1
⁄
8
˝ = 1´-0˝ view, so two copies of the
same block were inserted, one for each scale. The user then had to place the two blocks on
different layers to control their visibility. In addition, if sheet numbers changed, the user had
to make sure every copy of the elevation symbol block was updated to reflect the change.
The annotation scale feature does away with this need for redundancy. You can now use a
single instance of a block even if it must be displayed in different scale views. To do this, you
must take some additional steps when creating and inserting the block. Here's how you do it:
1.
Draw your symbol at the size it should appear when plotted. For example, if the symbol is
supposed to be a ¼˝ circle on a printed sheet, draw the symbol as a ¼˝ circle.
2.
Open the Define Block dialog box by choosing the Create icon from the Tool Sets palette.
3.
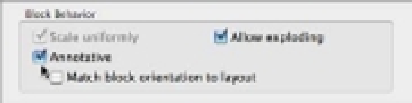
Turn on the Annotative option in the Block Behavior section of the Define Block dialog
box. You can also turn on the Match Block Orientation To Layout option if you want the
symbol to appear always in a vertical orientation (see Figure 4.14).
FIGURE 4.14
The Define Block
dialog box's Block
Behavior group
with the Annotative
option turned on
4.
Select the objects that make up the block, and indicate an insertion point as usual.
5.
Give the block a name, and then click Create Block.
After you've followed these steps, you need to apply an annotation scale to the newly created
block:
1.
Click the new block to select it.
2.
Right-click and choose Annotative Object Scale
Add/Delete Scales. The Annotation
Object Scale List dialog box appears (see Figure 4.15).