Graphics Programs Reference
In-Depth Information
Notice that the moon is no longer orbiting the planet. This is because you didn't
include pluto_moon_orbit
in your group Pluto_Orbit. The animation of the moon going
around Pluto is stored in that node; and because it's no longer
attached to Pluto_Orbit, there's no moon orbit of Pluto.
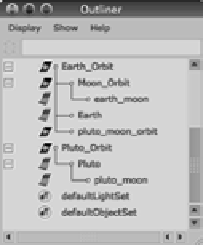
Figure 2.25 shows the hierarchy of Pluto and how it's differ-
ent from that of the other planets: the moon's orbit node has
been left out of the group. (Earth has been expanded as a con-
trasting example.)
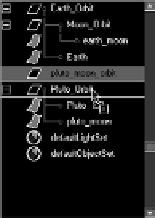
Using the Outliner, you can easily fix this problem. Place
the pluto_moon_orbit node under the Pluto_Orbit node. Go
to frame 1 of the animation, grab the pluto_moon_orbit node
in the Outliner, and use the middle mouse button to drag it to
the Pluto_Orbit node so that it has a black horizontal line above and
below it to show a connection, as in Figure 2.26.
You've just grouped pluto_moon_orbit under Pluto_Orbit, a
practice known as
parenting
. Now you need to parent pluto_moon
under pluto_moon_orbit as well. Use the middle mouse button to
drag pluto_moon onto pluto_moon_orbit. When you play back the
animation, you'll see that the moon is revolving around the planet,
while at the same time Pluto and the moon are orbiting the Sun.
Now that you've corrected Pluto's layout in the Outliner, it's similar to the layouts for the
other properly working planets.
The file
Planets_v3.mb
in the Scenes folder of the Solar_System project on the CD will
give you an idea of how this project should look. The first five planet systems are grouped
and animated as a reference, leaving the final four for you to finish.
Figure 2.25
Pluto's incorrect
hierarchy
Figure 2.26
Regrouping objects
in the Outliner
You can add objects to a group by MMB+dragging their listing onto the desired parent node
in the Outliner. You can also remove objects from a group by MMB+dragging them out of
the parent node to a different place in the Outliner.
g roU ping t erminology
g roU ping t erminology
Grouping terminology can be confusing. Grouping Node A under Node B makes Node A a
child of Node B. Node B is now the parent of Node A. Furthermore, any transformation or
movement applied to the parent Node B will be inherited by the child Node A.
When you group Node A and Node B, both nodes become siblings under a newly created
parent node, Node C. This new node is created just to be the parent of Nodes A and B and is
otherwise known as a
null node
. To group objects, select them and choose Edit
➔
Group. Par-
enting nodes together places the first selected node under the second selected node. For