Graphics Programs Reference
In-Depth Information
How the composite works is very simple. Ambient Occlusion gives you a black-and-
white pass of the same geometry you've already rendered. This pass is then multiplied
over the color render. That means a brightness value of white (a value of 1) in the
Ambient Occlusion pass won't change the color of the original render (when the origi-
nal color of the render is multiplied by 1, it stays the same color). The black parts of the
frame (with a brightness value of 0) turn those parts of the original render black (when
the original color of the render is multiplied by 0, it goes to black). The gray points of the
multiplying image darken the original render. It sounds confusing, but when you see it, it
makes much better sense.
The living Room
You'll now take the living room render made in the PDF file exercise on the CD and add
an Ambient Occlusion pass using render layers. You don't have to read the PDF exercise
to understand the concepts and practices for making an ambient occlusion pass here.
However, if you'd like to understand how to light the living room scene with Global
Illumination, you may wish to read that exercise on the CD now and then return to the
following.
Set your current project to the Livingroom project you copied from the CD, open the
livingRoom_v2.mb
file from the
Scenes
folder, and follow these steps:
1. Make sure mental ray is loaded, of course, and that Render Settings is set to render
with mental ray. As you did earlier, you need to create a new render layer for the
Ambient Occlusion. This layer requires all the objects in the scene but the lights to be
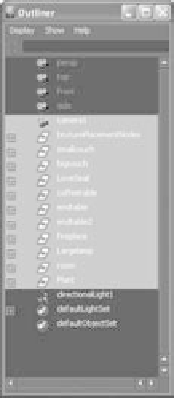
assigned to it. In this scene, the only light is a single directional light. In the Outliner,
select all the top nodes of the scene, but leave out the light, as shown in Figure 11.67.
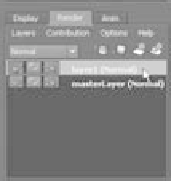
2. Click the Render radio button in the Layer Editor to switch to Render, and then click
the Create New Layer and Assign Selected Objects icon ( ). Doing so creates a new
layer (layer1) along with the preexisting masterLayer, as shown in Figure 11.68.
Figure 11.67
Select the scene
objects for your
Ambient
Occlusion pass.
3. Click the new layer (layer1) to activate it. Everything in the scene should display as it
did before, although the light disappears from view. Double-click layer1 to rename it
ambientOcclusion
.
4. You're going to use a preset to create a material override. This takes all the objects in
the scene and assigns a single material to them: in this case, an Ambient Occlusion
shader that generates the Ambient Occlusion pass for the entire scene. Right-click the
ambientOcclusion layer, and select Attributes. In the Attribute Editor, click and hold
down the Presets button. From the menu that appears, select Occlusion, as shown in
Figure 11.69.
Figure 11.68
Create a new
render layer.
If you're in Shaded mode, everything should turn black in the view panels. This
is normal, because everything now has the Ambient Occlusion Surface Shader