Graphics Programs Reference
In-Depth Information
5. You don't need this Ramp shader on the color of the shader anymore—you did this so
you could easily see the ramp color positions in the view panels. In the Hypershade,
select the White shader, and click the Input and Output Connections icon (
) to
graph the shader, as shown in Figure 7.51.
6. In the Attribute Editor, RMB+click the
Color attribute, and select Break Con-
nection from the context menu to dis-
connect the ramp from the color. Set the
Color back to white. Notice that the link
connecting the Ramp texture node to
the White shader node disappears in the
Hypershade window.
Figure 7.51
The White shader
has the ramp
attached as color.
Figure 7.52
Drag the White
shader to the Lay-
ered shader, and
delete the default
Green shader from it.
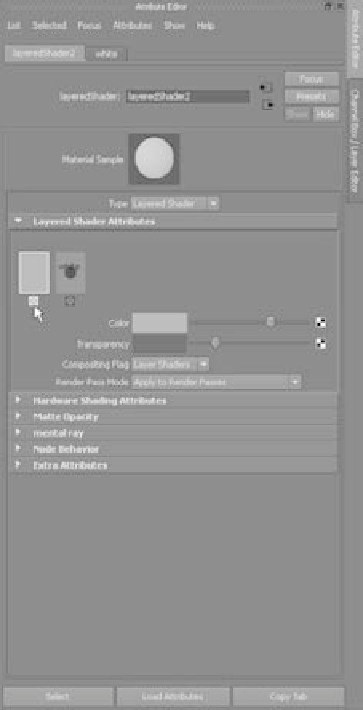
7. Create a Layered shader. MMB+drag
the White shader from the Hypershade
to the top of the Layered Shader Attri-
butes window, as shown in Figure 7.52.
Delete the default Green shader in the
Attribute Editor by clicking the checked
box below its swatch.
8. Create a new Blinn shader, and set its
color to black. Name the shader tire-
Shader. Select the Layered shader, and
then MMB+drag the new tireShader
from the Hypershade to the Layered
shader's Attribute Editor, placing it to
the left of the White shader, as shown
in Figure 7.53. Name the Layered shader
wheelShader
.
9. Select the wheels, and assign the wheel-
Shader Layered shader to them. The
wheels should appear all white. This
is where the ramp you created earlier
(wheelPositionRamp) comes into play.
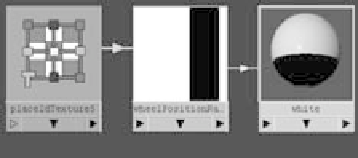
10. Select the wheelShader, and click Input
and Output Connections to graph the
network in the Work Area of the Hypershade window. In the top panel of the Hyper-
shade, click the Texture tab to display the texture nodes in the scene, so you can see
wheelPositionRamp's node.