Graphics Programs Reference
In-Depth Information
15. With the lattice still selected,
RMB+click one of the lines of the
lattice, and select Lattice Point from
the marking menu. You may have to
RMB+click around to get the correct
marking menu that displays Lattice
Point as a selection option. Try not to
RMB+click the wagon itself, to avoid
having the wrong marking menu
appear. Select the two bottom lattice
points, as shown in Figure 6.115.
16. Exit X-Ray mode with the lattice points
still selected by choosing Shading
➔
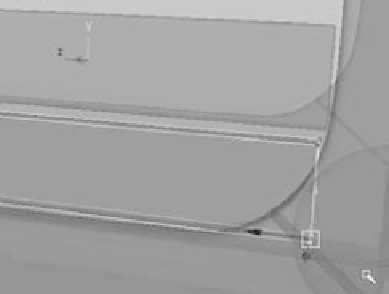
X-Ray to toggle it off in the persp panel. Move the two lattice points to deform the
bottom rail's end properly to create a gap between the railing and the wagon, as
shown in Figure 6.116.
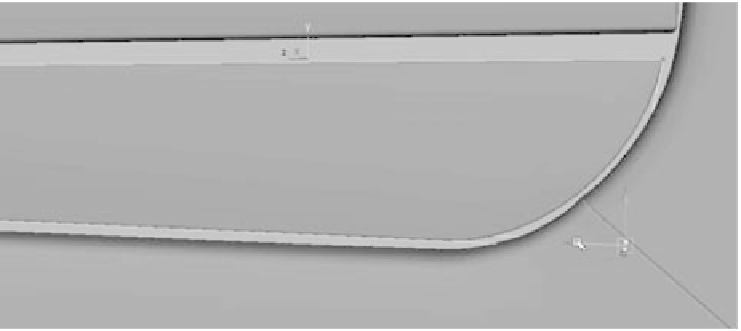
Figure 6.115
In X-Ray mode, select the bottom lattice points on
the end buried in the wagon.
Figure 6.116
Use the lattice to
put a gap between
the curved railing
and the wagon.
17. Select the railing mesh object, and delete its history to remove the lattice but keep the
deformation. Switch back to the Polygons menu set (F3).
18. You need to make the braces behind the railings. Create a poly cube, and then scale and
position it to match the front end brace behind the railings, as shown in Figure 6.117.
The brace should reach the floor of the wagon and should extend to just below the top
railing edge.
19. With the cube selected and in position, choose Edit Mesh
➔
Bevel
r
. Set Width to 0.25
and Segments to 3. This puts a slight bevel around the entire edge of the brace, as
shown in Figure 6.118. Having edges beveled helps light catch the edges of an object
when you light and render it, even for seemingly inconsequential parts of the model.