Game Development Reference
In-Depth Information
only allows ten events to be placed per map). Truly, it is unacceptable, period, even if you have the full version. Why
spend 10-40 events for area transitions on a single map when you can cover them all in one? This exercise requires the
use of the following:
•
The Parallel Process event trigger
•
A pair of variables to hold the character's coordinates
•
Liberal use of the Conditional Branch event command
First, switch to Event editing mode. Then, find a nice spot in the second map that the player cannot reach. In my
case, I'll be using one of the squares on the mountaintop. Afterward, create a new event at that square. Set the event
trigger to Parallel Process. Next, we'll have to check for the player's x and y positions at all times. That is the reason
why we use Parallel Process. (Remember: Autorun is meant more for cinematic sequences. Trying to use it for an
event such as this will only cause the game to hang.) The secret lies in the Control Variables command, specifically the
Game Data category of operand. The Game Data category defaults to Map ID. Click the button labeled “...” on the far
end of the bar, to change what type of data you want to assign to your variable.
Once you click the button, you'll notice a slew of possible things you can plug into a variable. What we're looking
for is the player's position on the map (a.k.a. his/her x and y coordinates). Thus, we click the Character option, which
defaults to Player's Map X. Exactly what we need! Select that, then make sure you're saving the value to a new variable
(I'm calling it variable 2 X and variable 3 Y). Afterward, create a new Control Variable command and repeat the
process up to the point where you are looking at the Player's Map X setting. Click the arrow on the drop-down menu
for Map X, and it will reveal four more settings. The one we want, of course, is Map Y.
Here's where it gets interesting. I'm going to recommend that you lower the map size down to 23
×
15 (the size of
the grass rectangle we made in starting our second map). To be fair, it doesn't particularly matter for this exercise, but
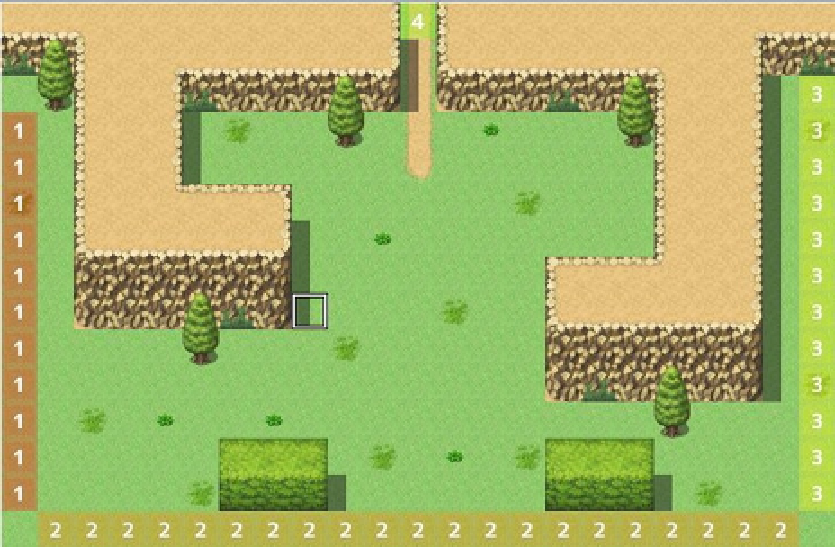
it'll help you visualize the boundaries in-game. Now what you have to do is figure out the boundaries of each side of
the map on which you want to have area transitions. Let me use some Region numbering, shown in Figure
2-17
, to
help you visualize what I mean.
Figure 2-17.
The map Regions for our transitions