Game Development Reference
In-Depth Information
4.
Then, click Graphics/Tilesets.
5.
Click Import and then find the !Door1 graphic set that you exported.
6.
Last, go to the Tileset tab of the Database and assign !Door1 to the D tab of the Exterior
tileset.
Now you can place doors to cover the entrances, for your screenshot needs. Just make sure to erase the graphics
afterward! After concealing the map's events, zoom out the map until you can snap a screenshot of it in its entirety.
(For the port town, a 1/2 scale will be sufficient.) Then, use your image editing software of choice (any will work,
including Windows' own Paint application) to resize it to 546
×
417. Next, you'll want to make a picture that can be used
as a marker for the player's current location. It should be small enough that it doesn't take up an excessive amount of
space on the map, yet big enough that it can actually be seen. The marker that I created is 30
×
30 in size. Once we have
both of our pictures, we need to add them to our Resource Manager. Find the Graphics/Pictures folder in the manager
(curiously, RMVXA comes with no stock pictures) and import your two images to that folder accordingly.
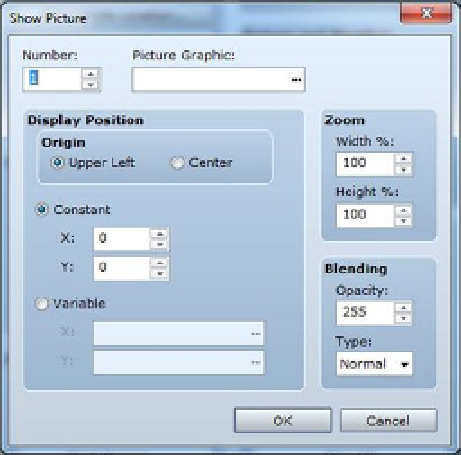
Using the Show Picture Event Command
With that set up, it's time to use the
Show Picture
event command. Take a look at Figure
15-11
to see a screenshot of
the event command, as displayed within RMVXA.
Figure 15-11.
A screenshot of the Show Picture event command
You can assign a picture a control number. As the tool tip in RMVXA states: “Control number of the display
picture. Those with the largest screen display number take precedence.” Think of it like a stack of papers. The lower a
picture's number, the deeper it is located within the stack. So, if we want our marker to be placed on top of the map, it
must have a higher control number. With that said, you can pick any number from 1 to 100. The map could be 99, and
the marker could be 100. To keep it simple, I'll give the map a 1 and the marker a 2. We can set which graphic is shown
by selecting it with
Picture Graphic
. If you hadn't imported the two images to Graphics/Pictures accordingly, the
browser window would be empty. For
Display Position
, we'll want the automap to be positioned at 0,0, with an Upper
Left origin.
Origin
determines how the image is placed on the screen. If you choose Center, then it will be the map's