Graphics Programs Reference
In-Depth Information
How to produce a raster image
1.
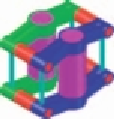
Construct the 3D model to the shapes and sizes given in Fig. 19.1
working in four layers, each of a different colour.
2.
Place in the
ViewCube/Isometric
view.
3.
Shade the 3D model in
Realistic
visual style.
4.
Zoom
the shaded model to a suitable size and press the
Print Scr
key of the keyboard.
5.
Open the Windows
Paint
application and
click
Edit
in the menu bar,
followed by another
click
on
Paste
in the drop-down menu. The whole
AutoCAD screen which includes the shaded 3D assembled model
appears.
6.
Click
the
Select
tool icon in the toolbar of
Paint
and window the 3D
model. Then
click
Copy
in the
Edit
drop-down menu.
7.
C
lick
New
in the
File
drop-down menu, followed by a
click
on
No
in
the warning window which appears.
8.
Click
Paste
in the
Edit
drop-down menu. The shaded 3D model
appears.
Click
Save As…
from the
File
drop-down menu and save the
bitmap to a suitable fi le name - in this example
Fig05.bmp
.
9.
Open the orthographic projection drawing (Fig. 19.1) in AutoCAD.
10.
Following the details given on page 386 attach
Fig05.bmp
to the
drawing at a suitable position (Fig. 19.5).
Ø50
Hole Ø40
10
Ø5
Ø20
Ø10
5
Ø30
Ø30
Holes Ø20
180
Parts B1; B2; B3 of B100/5
A. Reader
Scale 1:1
15/10/2006
Fig. 19.5
Example - Raster image in a drawing


Search WWH ::

Custom Search