Graphics Programs Reference
In-Depth Information
11.
Turn layer
0
back on and move the top into its correct position relative
to the main part of the valve. Then with the
Mirror
tool, mirror the
top to produce the bottom of the assembly (Fig. 17.8).
12.
While in the
UCS X
view construct the three parts of a 3D model of
the extrusion to the main body.
13.
In the
UCS *WORLD*
view, move the parts into their correct position
relative to each other.
Union
the two fi lleted rectangular extrusions and
the main body.
Subtract
the cylinder from the whole (Fig. 17.9)
Fig. 17.8
Second
example UCS - step
11 rendering
.
14.
In the
UCS X
view, construct one of the bolts as shown in Fig. 17.10,
forming a solid of revolution from a pline. Then construct a head to
the bolt and with
Union
add it to the screw.
15.
With the
Copy
tool, copy the bolt 7 times to give 8 bolts. With
Move
,
and working in the
UCS *WORLD*
and
X
views, move the bolts
into their correct positions relative to the 3D model.
16.
Add suitable lighting and attach materials to all parts of the assembly
and render the model.
17.
Place the model in the
ViewCube/Isometric
view.
18.
Save the model to a suitable fi le name.
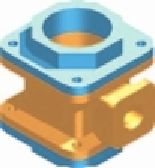
Fig. 17.9
Second
example UCS - steps
12 and 13 rendering
19.
Finally move all the parts away from each other to form an exploded
view of the assembly ( Fig. 17.11 ).
5
Third example - UCS ( Fig. 17.15 )
1.
Set
UCSFOLLOW
to
1
.
2.
Place the drawing area in the
UCS X
view.
3.
Construct the outline (Fig 17.12) and extrude to a height of
120
.
4.
C
lick
the
3 Point
tool icon in the
View/Coordinates
panel ( Fig. 17.13 ):
Fig. 17.10
Second
example UCS - pline
for the bolt
Command: _ucs
Current ucs name: *WORLD*
Specify origin of UCS or [Face/NAmed/OBject/
Previous/View/World/X/Y/Z/ZAxis] <World>: _3
Specify new origin point <0,0,0>: pick point
(Fig. 17.14)
Specify point on positive portion of X-axis: pick
point (Fig. 17.14)
Specify point on positive-Y portion of the UCS XY
plane <-142,200,0>: enter .xy right-click
of pick new origin point (Fig. 17.14) (need Z):
enter 1 right-click
Regenerating model
Command:
Fig. 17.11
Second
example UCS


Search WWH ::

Custom Search