Graphics Programs Reference
In-Depth Information
2.
In the dialog,
click
the
Modify …
button.
3.
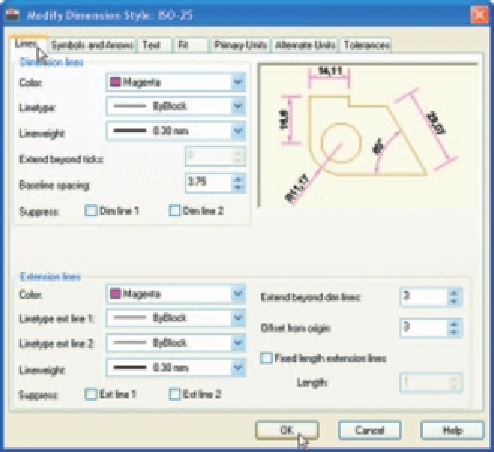
The
Modify Dimension Style
dialog appears (Fig. 4.11). This dialog shows
a number of tabs at the top of the dialog.
Click
the
Lines
tab and make
settings as shown in Fig. 4.11. Then
click
the
OK
button of that dialog.
Fig. 4.11
The setting for Lines in the Modify Dimensions Style dialog
4.
The original
Dimension Style Manager
reappears.
Click
its
Modify
button again.
5.
The
Modify Dimension Style
dialog reappears ( Fig. 4.12 ),
click
the
Symbols and Arrows
tab. Set
Arrow
size to
6
.
6.
Then
click
the
Text
tab. Set
Text style
to
Arial
, set
Color
to
Magenta
,
set
Text Height
to
6
and
click
the
ISO
check box in the bottom right-
hand corner of the dialog.
7.
Then
click
the
Primary Units
tab and set the units
Precision
to
0
, that
is no units after decimal point and
Decimal separator
to
Period
.
Click
the sub-dialogs
OK
button ( Fig. 4.12 ).
8.
The
Dimension Styles Manager
dialog reappears showing dimensions,
as they will appear in a drawing, in the
Preview of my-style
box.
Click
the
New …
button. The
Create New Dimension Style
dialog appears ( Fig. 4.13 ).
9.
Enter
a suitable name in the
New Style Name:
fi eld - in this example
this is
My-style
.
Click
the
Continue
button and the
Dimension Style
Manager
appears (Fig. 4.14). This dialog now shows a preview of the
My-style
dimensions.
Click
the dialog's
Set Current
button, following
by another
click
on the
Close
button. See Fig. 4.14 .
Search WWH ::

Custom Search