Java Reference
In-Depth Information
26 frame.setLocationRelativeTo(
null
);
// Center the frame
27 frame.setDefaultCloseOperation(JFrame.EXIT_ON_CLOSE);
28 frame.setVisible(
true
);
29 }
30 }
create frame
set visible
(a) (b)
F
IGURE
12.5
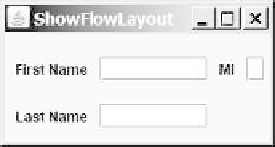
The components are added by the
FlowLayout
manager to fill in the rows in
the container one after another.
This example creates a program using a style different from the programs in the preceding
section, where frames were created using the
JFrame
class. This example creates a class named
ShowFlowLayout
that extends the
JFrame
class (line 6). The
main
method in this program
creates an instance of
ShowFlowLayout
(line 23). The constructor of
ShowFlowLayout
con-
structs and places the components in the frame. This is the preferred style of creating GUI
applications—for three reasons:
Creating a GUI application means creating a frame, so it is natural to define a frame
to extend
JFrame
.
■
The frame may be further extended to add new components or functions.
■
The class can be easily reused. For example, you can create multiple frames by creating
multiple instances of the class.
■
Using one style consistently makes programs easy to read. From now on, most of the GUI main
classes will extend the
JFrame
class. The constructor of the main class constructs the user inter-
face. The
main
method creates an instance of the main class and then displays the frame.
Will the program work if line 23 is replaced by the following code?
JFrame frame =
new
ShowFlowLayout();
Yes. The program will still work because
ShowFlowLayout
is a subclass of
JFrame
and the methods
setTitle
,
setSize
,
setLocationRelativeTo
,
setDefaultCloseOperation
, and
setVisible
(lines 24-28) are all available in the
JFrame
class.
In this example, the
FlowLayout
manager is used to place components in a frame. If you
resize the frame, the components are automatically rearranged to fit. In Figure 12.5a, the first
row has three components, but in Figure 12.5b, the first row has four components, because the
width has been increased.
If you replace the
setLayout
statement (line 10) with
setLayout(new
FlowLayout(FlowLayout.RIGHT, 0, 0))
, all the rows of buttons will be right aligned
with no gaps.
An anonymous
FlowLayout
object was created in the statement (line 10):
setLayout(
new
FlowLayout(FlowLayout.LEFT,
10
,
20
)
);
which is equivalent to:
FlowLayout layout =
new
FlowLayout(FlowLayout.LEFT,
10
,
20
);
setLayout(layout);