Hardware Reference
In-Depth Information
into the bay for the moment; you can attach it with screws after you've run the cables.
It's easier to fi t your hand into the tight spaces where the cables connect if the drive isn't
already secured.
Some cases don't use screws to hold the drives in place; instead they use plastic rails that
snap onto the sides of the drive and then slide into grooves in the drive bays. Check the
existing drives to see how they're secured, and follow that lead.
Connecting the Data and Power Cables
Next, connect the cables to the drive. Each drive requires two cables: one to connect to the
motherboard, and one to connect to the power supply. PATA drives use a 40-pin ribbon
cable to connect to the motherboard and a four-pin Molex connector to the power supply.
SATA drives use a small SATA connector and cable to connect to the motherboard and a
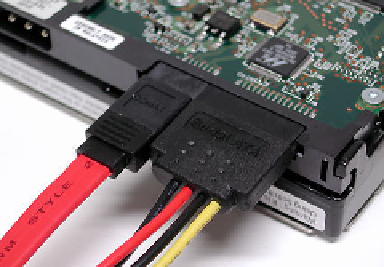
SATA power connector to connect to the power supply (see Figure 7.13).
FIGURE 7.13
Connect the power and data cables.
If you're connecting a PATA ribbon cable, you need to make sure the red stripe on the
cable, which signifi es pin 1, is at the end closest to where the power connector plugs into
the disk drive. Some cables are keyed to prevent you from putting them on backward.
If your motherboard and/or power supply don't have the appropriate
connectors to attach the drive you want to use, adapters are available at your
local computer store that will change the plugs to the right size (and voltage).
Powering Up and Partitioning/Formatting
After the drive has been physically installed, start up the computer and try it out. If it's a CD
or DVD drive, it should work automatically with no special setup. Optical drives use the
standard drivers that come with the OS and don't require proprietary drivers in most cases.