Hardware Reference
In-Depth Information
Setting Up a Printer
Most printers today use a USB connection. Any full-size USB cable and port will work, but
the fastest performance will come with a USB 2.0 or higher cable.
USB is a Plug and Play interface. Thus when you connect the printer to the computer,
the computer will likely recognize the printer automatically and set it up for you. However,
having the printer automatically set up isn't always a good thing! Some printers come with
their own special software that makes them easier to use, and multifunction printers come
with special software that enables their extra features like faxing, scanning, and copying. If
you allow Windows to auto-install the printer via Plug and Play, you may miss out on some
of these features. Therefore, the instructions that come with some printers specify that you
should run the setup software fi rst, and then connect the printer only when specifi cally told
to do so during the setup.
Some older printers use a
parallel printer
interface. A parallel printer cable connects to a
25-pin parallel connector, also called the
LPT port
, on the PC. (Most PCs made today don't
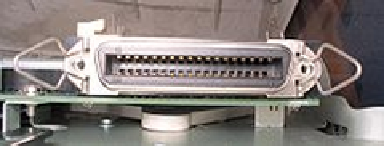
have this connector.) At the other end of the parallel printer cable is a 36-pin Centronics
connector that connects to the printer. (
Centronics
is a brand and type of connector that
uses a plastic bar wrapped with metal tabs. Figure 3.1 shows a Centronics connector.) This
type of connector isn't Plug and Play, and the computer must be off in order for it to be
connected or disconnected.
FIGURE 3.1
Centronics connector on an old parallel printer interface
Sharing a Printer on a Network
After setting up a printer to print on your local PC, you may decide also to make it
available to other users on your network. This is called
sharing
the printer. When a printer
is shared, others can use it as long as the PC doing the sharing remains powered on. If you
turn off that PC, nobody else will be able to use the shared printer. (If that's unacceptable,
consider a network-enabled printer, which has its own address on the network independent
of any PC.) To share a printer, open the Printer Properties for the printer and, on the
Sharing tab, select the Share This Printer check box.
EXERCISE 3.1
Share a Printer on a Network
1.
In Windows 7, click Start
Printers And Devices.
2.
Right-click the printer you want to share. This should be a local printer, not one that you
access via the network.