Information Technology Reference
In-Depth Information
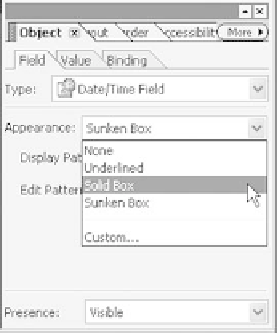
3. Click the Appearance drop-down arrow on the Object palette's Field tab and select Solid Box to
change the field's appearance (Figure 11.8).
Figure 11.8
Change the field's appearance
4. Click the Display Pattern's drop-down arrow on the Field tab to choose a pattern or type a custom
one as we are doing using a MM-DD-YYYY pattern.
5. In the Object palette, under the Binding tab, type
Date
in the Name field. Next to Data Pattern, type
MM-DD-YYYY
, which is how the data will be transferred back to you.
Specifying Required Fields
To define a field as "required" use the Object palette. Click the Value tab, and select the type to User
Entered - Required type. If a user tries to submit the form without completing the required field, Acrobat
displays an error message and highlights the field(s) that needs to be completed.
Adding a Text Field
Next it is time to add fields for the user's information. Follow these steps to add and configure the first
field:
1. Click the Text Field object on the Standard tab of the Library palette and drag a text field to the
form. Change the caption to First Name.
2. On the Field tab in the Object palette, click the Appearance drop-down arrow and choose
Underlined. The sunken box turns into a line.
3. Click the Layout palette, and the click the Position drop-down arrow in the Caption section and
choose Bottom; the caption is now centered under the field's line (Figure 11.9).
4. Choose Align Center in the Paragraph toolbar; and change the font size to 12pt in the Font toolbar
(Figure 11.10).
Note:
Designer will not allow spaces in the Name field as data connections do not allow for blank spaces. Decide on
the naming style you are going to use before starting the project, such as capping each element in a hierarchical
name or using underscores.


Search WWH ::

Custom Search