Information Technology Reference
In-Depth Information
fields and subforms in the Border palette; add accessibility features like alternate text in the
Accessibility palette.
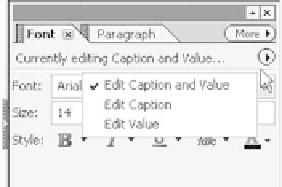
Figure 11.6
Edit captions, values, or both
Adding Form Content
Let us get back to the form design. Adobe Designer placed two buttons on our form because we chose to
have the form either emailed to us or printed in the wizard during set up. We will move the buttons and
then add more content, following these steps:
1. Shift-click to select both buttons and drag them to the bottom of the page. With the buttons still
selected, choose Layout > Center in page > Horizontally.
2. Next add a title to the form. Click the Standard tab in the Library palette to display it. Click Text and
drag to the form (Figure 11.7). A default Text block is added to the form.
3. Highlight the default text in the text block and type
Interest Survey
. Use the Font palette to increase
the size of the font and center the title horizontally on the page.
4. Add another Text block and type a short explanation of the form's purpose. You can resize the text
box by dragging its resize handles on the corners, or type dimensions in the Layout palette.
Figure 11.7
Drag an object to the Body Pages view to add it to the form.
Adding a Date Field
The first active field we'll add to the form is the date field. It is VERY important to name all your fields
appropriately when creating the form if you are going to be collecting data electronically. If you choose
names carefully now, creating/adding to your database later will be infinitely easier.
Follow these steps to add and name the first field:
1. Select the Date/Time Field object in the Standard tab of the Library palette, and drag a field to the
left side of the form.
2. Select the default text and type
Today's Date
.

Search WWH ::

Custom Search