Java Reference
In-Depth Information
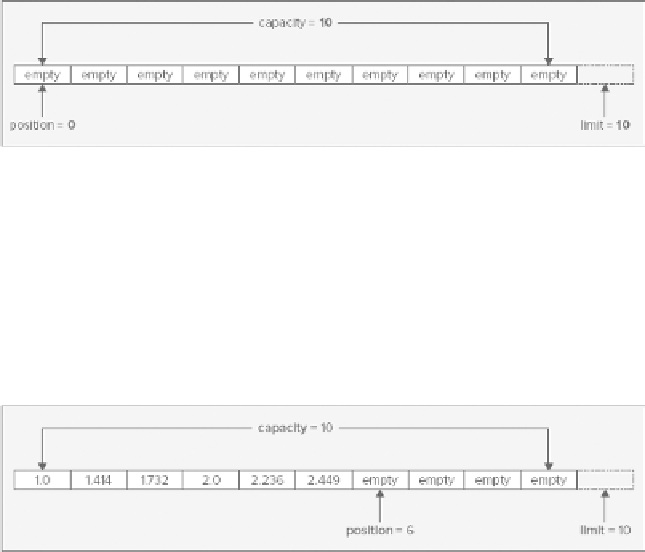
The limit is automatically set to the capacity, 10, so it points to the position that is one beyond the last
value. You could load six values of type
double
into this buffer with the following statements:
double[] data = { 1.0, 1.414, 1.732, 2.0, 2.236, 2.449 };
doubleBuf.put(data); // Transfer the array elements to the buffer
The
put()
operation automatically increments the position for the view buffer. Now the buffer is shown
in
Figure 10-8
.
The position and limit values are now set to values ready for more data to be added to the buffer. The
value of
position
points to the first empty element, and
limit
points to one beyond the last empty element.
Of course, the position for the backing
ByteBuffer
is still in its original state, but you can update that to
correspond with the data you have loaded into the view buffer with the statement:
buf.Position(8*doubleBuf.Position());
If you now want to write the data you have in the byte buffer to a file, you must change the values for
position
and
limit
in the byte buffer to identify the elements that are to be written. A file write operation
writes data elements starting from the element in the buffer at the index specified by
position
, and up to
and including the element at the index
limit-1
. To write the data to the file, the limit for the byte buffer
needs to be set to the current position, and the position needs to be set back to zero. You could do this expli-
citly using the methods you have seen. For example:
buf.limit(buf.position()).rewind(0);
This first sets the limit to the byte referenced by the current position and then resets the position back
to the first byte, byte 0. You could call the
position()
method with the argument 0 instead of calling
re-
wind()
. However, you don't need to specify the operation in such detail. The
Buffer
class conveniently
defines the
flip()
method that does exactly this, so you would normally set up the buffer to be written to a
file like this:
buf.flip();