Graphics Reference
In-Depth Information
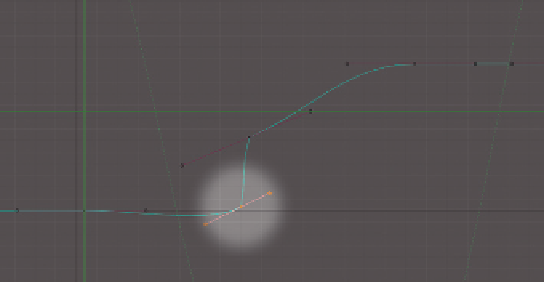
21. You can see the result of this in
Figure 3.23
.
To handle the second rotation, Ctrl-
LMB click between the last two points
on the curve. RMB select the new point
and use the G key to move it … where?
Think about it for a second. We want
no change in rotation, again, followed by
an abrupt change before the final key.
If you thought to put it on the same
horizontal line as the middle key, moving
it as close to the last key from left to right as possible, then you've got it. The only way this edited curve
differs from our target in
Figure 3.22
is in the point handles. You've no doubt noticed that each of the
vertices in the editor have two handles growing away from them. RMB selecting these handles and moving
them with the G key leaves the point itself in place, but changes the way the curve flows into and out
of it. A little bit of playing with the handles on the moved points will bring the example right into line
with the reference.
Figure 3.23
A new point added to an F-curve and moved.
Use Alt-A to play the animation now. Hopefully it actually does what you intended. This concept of
visualizing motion as a series of curves on a graph can be a bit much at first. If you still don't get it, you
can watch the short video in the Web Bucket (
f-curve-basics.mpeg
) in which I demonstrate and explain this
in a little more detail.
So, you've done this the “hard” way. Let's do it the sort of easier way. I say “sort of,” because while this
way doesn't require as much handwork and conceptual shenanigans, it does require some forethought.
That's all right, though. Animation itself requires forethought. To animate well, you'll need to really think
about how things move, when they stop, when they start, what isn't changing about them, and a host of
other things. You'll need to become an active, careful observer of motion.
In the panel of the Graph Editor, use Shift-LMB to highlight all of the curve names (X Location through
Z Euler Rotation). Hit the X key to delete them. Boom. Animation gone. Using either the arrow keys
or the timeline in the Graph Editor, return the frame counter to 1. We're going to do this animation
over, and build the motion we want directly into it.
Return Suzanne to the upper left corner of the 3D view. Set a
LocRot
key (I key). On the Timeline
view header, find the little red dot button, the one that usually stands for “record” on physical playback
devices. LMB click to enable it. This button activates
automatic keyframing
. Once you've set an initial
keyframe, any changes you make to an object's transformations are recorded and keyed automatically. When
you're animating, this is an immense timesaver. You don't have to constantly hit the I key and choose a
key type. With that in mind, advance 20 frames (↑ twice). Move Suzanne down. Normally, you'd hit the
I key here, but autokeying takes care of setting a new transformation key for you on this new frame.
Advance 3 or 4 frames. Rotate Suzanne 90 degrees clockwise. Advance 20 frames; you should now be at
Search WWH ::

Custom Search