Graphics Reference
In-Depth Information
it about, it will generate both good and bad poses for the arm.
The point, though, is to get the hands down near the sides and
into a fairly natural (asymmetrical!) pose. Pulling them down with
Auto IK is just the first step. As you work the arm by moving
the hand bone with AutoIK, it's okay to accept a bad or subop-
timal pose with the LMB, change your point of view, and con-
tinue moving it. For example, you might want to adjust the
hand's position back-to-front in a side view, while fixing its left-
to-right distance from the hip in a front view.
It doesn't matter if the hand or other parts of the arm are oriented
incorrectly. We'll fix them in a moment. Our goal was to get
the arms out of their airplane wing position.
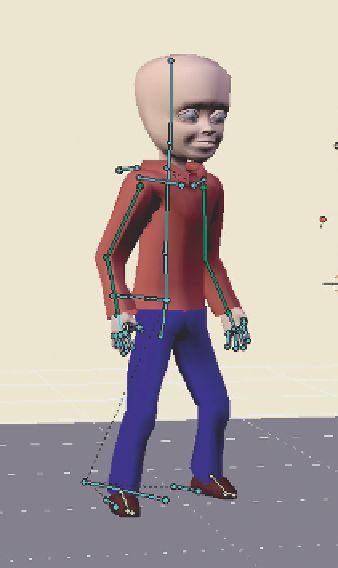
Figure 11.7
shows
the pose from Camera view with the arms moved using only
Auto IK and the hand bones. To do it, I grabbed each hand
bone individually and alternated between working in front and
side views.
Let's get him to face the camera a bit. RMB select the upper
spine bone (called
spine_upper
in the example file). The rotation
widget appears on it, and since we set the widget to use Normal
mode, it is perfectly aligned with the bone. LMB dragging on
the green orbit of the widget rotates the bone along its
y
axis,
which is to say it causes the bone to roll in place. Now, we
could simply make the character face directly at the camera by using this bone alone, but that's not natural.
Let's say that our goal is to have the face looking directly into the camera to start the shot, so our little
guy can deliver a salute to the viewer before he starts walking. A pose that involves the spine, head, and
neck should actually make use of all of their articulations. So, using the upper spine bone, rotate it a small
distance toward camera-facing. Then, select the neck bone and turn it a little further. Finally, select the
head bone and go the rest of the way.
Figure 11.8
shows the result. To add a little character to the pose,
I've also tilted the head a bit to the left (from our view) and tipped the chin up slightly.
Figure 11.7
Bring the arms down.
Grab the heel bones that control the location and rotation of the feet and give him a bit of a forward
stance: right foot forward, left foot a little back. You can do this most easily from a top view so that the
feet never move along the
z
axis. However, you might want to consider doing it from the Camera view
as well, so you can better see the final effect. When moving the feet in Camera view, constrain the motion
using Shift-Z. It allows the bone to move freely along the
x
and
y
axes, but not up and down. We're not
shooting for a widespread karate-punch stance, so don't overdo it. A little bit of spread, plus the forward
and back to remove the symmetry of the default pose. Once you have the feet moved, grab the
body_
control
bone that protrudes from the base of the spine and move it down just a touch. As the feet are
governed by IK, they stay in place, causing the knees to flex slightly and the upper body to drop.
Figure
11.9
shows the pose thus far.
Search WWH ::

Custom Search