Graphics Reference
In-Depth Information
Now, set the current frame counter to frame 1 in
the timeline and maximize the 3D view with
Shift-
spacebar
. When you're posing, there's almost no
need to waste screen space on anything else.
Let's start the character slightly in front of the
window, facing toward the camera. To change the
overall location of the character, remember to grab
the root bone in Pose mode, as opposed to moving
the armature object itself in Object mode.
Figure
11.5
shows the character's default location in an
overhead view, followed by where we put it by
transforming and rotating the root bone.
And now, we create our first pose. To make it
easier, show the tool shelf (T key) and enable
Auto
IK
at the very bottom.
Auto IK
is a posing tool
that, as discussed in Chapter 9 on rigging, allows us
some more freedom while posing and gives a more
intuitive feel.
Figure 11.6
shows a before and after
of the character's initial pose. It's obviously a big
difference, and for this first one, let's analyze how
we use the armature controls to actually build the
pose.
Use the Numpad-0 key to set the display to the
Camera view, as we always want our animation to
“play to the camera.” This doesn't mean that your
characters should look at or interact with the camera,
but that the only thing that really matters about your
posing and animation is
how it looks from the camera
.
Many times, your character might end up with some kind of funky arm motion going from one extreme
pose to another. An elbow might pass through a stomach. Fingers might rotate backwards for a couple of
frames. Whatever. The point is that as long as you can't see it from the camera, it doesn't matter, and you
shouldn't waste one second worrying about it.
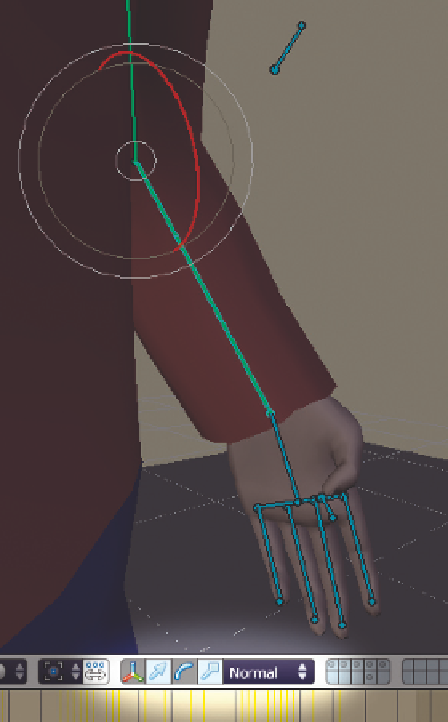
Figure 11.4
Enabling the rotation widget and setting it to
Normal space.
In the tool shelf just above the Auto IK control is the
X-Axis Mirror
control. Make sure it is disabled.
One of the battles you'll fight constantly when animating is to change the set of fairly mechanical controls
at your disposal into something that appears to be alive. Symmetry of motion and posing is not something
that any living thing exhibits. At first, you might have to strive to break up any accidental symmetry that
creeps into your work.
So with Auto IK enabled and X-Axis Mirror disabled, RMB select one of the main hand bones and press
the G key. Due to the Auto IK setting, moving the hand pulls the whole arm along with it. As you move
Search WWH ::

Custom Search