Graphics Reference
In-Depth Information
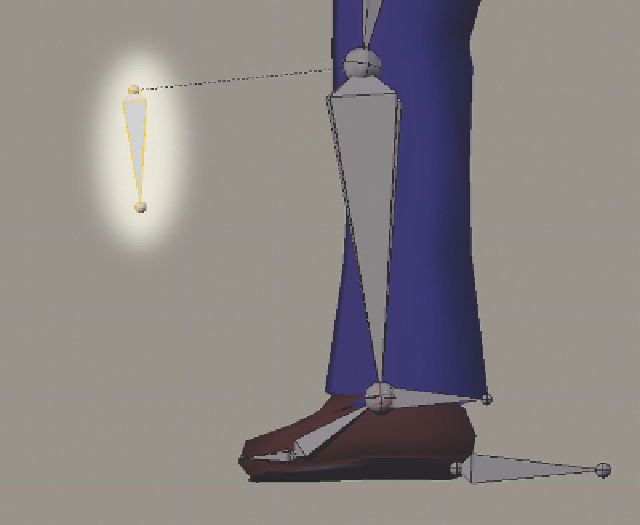
Adding a Pole Target
Head back to a side view and
enter Edit mode. Select the
lower leg bone—the one
with the IK constraint—and
use Shift-D to duplicate it.
Move the duplicate in front
of the leg bone, then scale it
downward until it looks
something like
Figure 9.14
.
We're going to use this bone
to influence the rotation of
the lower leg. An IK con-
straint can use something
called a
Pole Target
. This is
a secondary target bone that
the constrained bone will
always adjust its roll to face.
To use this new bone as a
pole target for the lower leg,
switch to Pose mode and use
the “X” control on the Bone
Constraint properties to delete the IK constraint from the new bone. This bone had a constraint because
we duplicated it from a bone that already had a constraint.
Figure 9.14
The creation of the pole target bone.
In Edit mode again, select this pole target bone, then Shift-RMB select the heel bone. Use Ctrl-P to make
the heel bone its disconnected parent. Name the bone something like “pole_target_L.” What this will do
is cause the pole target bone to swing in space as the heel bone is rotated. The IK-constrained lower leg
will rotate to face it, meaning that the whole leg will rotate along with the heel and foot.
One last step. In Pose mode, select the lower leg bone and check out the
Pole Target
field on the IK
constraint on the Bone panel. Use the pop-up control to find the armature object itself. When you do,
another control appears below it for locating the bone. Since you named the target bone, its easy to find
and select it now.
Here's the subjective part. Depending on how everything lines up—even a few degrees can make a dif-
ference—this might mess up the starting rotation of your lower leg bone. The
Pole Angle
control on
the IK constraint panel allows you to adjust this. There's no way for me to tell ahead of time what your
adjustment will need to be on your own rig. The pole angle on the left leg in my own armature was −84
degrees. To find the right value for your rig, just slide the control and watch what happens in the 3D
view. When the leg is oriented correctly to the front, you've found the proper value. The odds are that
the value on the opposite side of the rig will be close to the same.
Search WWH ::

Custom Search