Graphics Reference
In-Depth Information
Color Ramps
Enabling the little checkbox at the top of the Colors panel brings up the
Color Ramp
interface.
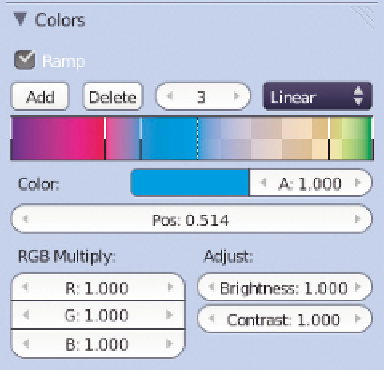
Color ramps are Blender's name for what are sometimes called gradients or blends in other soft-
ware. Basically, a ramp is a band that varies in color and possibly in Alpha across its width.
Figure
7.7
shows a typical color ramp. Each of the vertical bars within the band represent a set RGB and
Alpha point. The ramp interprets the colors between
them, then uses that result for the texture, instead of
simple black to white. Note the vertical bar in the
center of the figure; it is dashed while the others are
solid lines. This dashing indicates selection. To select
a bar, LMB click on it. When you do, its color and
Alpha values are displayed below the band, in the
color swatch and the
A
slider. To change those
values, just operate the controls as you would else-
where in Blender. You can change the position of the
selected bar by LMB dragging it to its new location
along the band. Adding new bars (for increased color
detail) is accomplished by Ctrl-LMB clicking within
the band, just like adding vertices to a mesh. Selected
bars are removed by LMB clicking the
Delete
button
above the band.
We'll revisit color and Alpha ramps when we deal
with hair texturing later in this chapter.
Figure 7.7
Blender's Color Ramp controls.
Once you have an actual texture, whether it be generated by Blender (procedurals) or brought in from a
camera or paint program (images), you need to decide how it will be applied to your geometry. This is
another area where the wrong choice can ruin your work. While there are 11 mapping possibilities in
Blender, each with a number of attendant options, only 2 of them are really necessary for general work:
Generated
and
UV
. Some of the others are useful for special purposes (Strand, Reflection) that we'll get
to later. The question you need to answer about your object in relation to mapping is: Does the texture
that I have apply to the surface only (like a tattoo, a coat of paint, or a wood veneer) or does it go the
whole way through (rings in a piece of wood or veins in marble)? If the texture in the real-world version
of the object is “discovered” because of the pattern formed by carving a solid object, then you will use
Generated
mapping (the texture mapping is
generated
from the relative locations of the surface and the
center of the object). However, if the texture is the result of some kind of surface application,
UV
is the
way to go.
We'll deal with UV mapping in a later section, so let's take a look at Generated mapping now. First,
Generated mapping is mostly going to occur with procedural textures. Think about it for a second. Image-
based textures are going to take a flat picture and apply it somehow to your 3D model. It's quite possible
that it will be a picture of that kind of surface from the real world. As you're using an image of a
surface
,
it will probably be applied to the
surface
, which according to our previous test indicates it will be UV

Search WWH ::

Custom Search